-
-
T-Nut M5
-
Double L Bracket
-
Low Profile Screw M5x8mm
-
Set T-Nuts in position, but don't tighten them yet.
-
Repeat this step for the 12 Double L Brackets included in your kit
-
-
-
Y Spoiler Support 2040 Profile (x3)
-
Low Profile Screw M5x8mm
-
T-Nut M5. For 2 of the profiles, insert only 2 T-Nuts on the same side. For the 3rd one, insert 2 on each side, just like in the picture.
-
Single L Bracket. Mount them into each of the T-Nuts you slid into the slots. The top face of the L Bracket should be flush with the top face of the profile.
-
On the 2 profiles with only 2 Single L Brackets, space out the L Brackets so that one is at about 1/3 of the length of the profile and the second one at about 2/3 of the length.
-
On the remaining profiles (with 4 Single L brackets), place the L Brackets closer to each other and close to the middle of the profile.
-
Double L Brackets (the ones you set up on the previous step). Slide them inside the 2040 slots and tighten the screws. The face of the L Brackets should be flush with the end of the profiles.
-
-
-
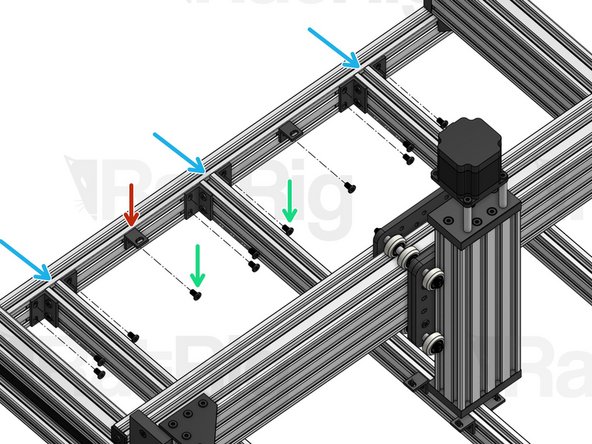
Install the 2040 profiles on your frame. The profiles with 2 Single L Brackets should be placed on the outer positions (with the L brackets facing inwards). The profile with 4 Single L brackets should be in the middle.
-
Even out the spacing between the profiles and then align the holes on the Double L Brackets with the T-Nuts you inserted in the X Base 2040 profiles on the previous chapter of this guide.
-
Single L Bracket. Install 2 on each X Base 2040, mounting them on the T-Nuts that you inserted before. The top face of each L bracket should be flush with the top face of the profile.
-
Low Profile Screw M5x8mm. Before tightening them, make sure that all profiles are perfectly square.
-
Cancel: I did not complete this guide.
One other person completed this guide.


