-
-
This procedure can be found on the OpenBuilds Documentation, for further information click here.
-
Follow this step if you don't have access to a multimeter. Otherwise, Skip to Step 2.
-
If the two wires you joined together belong to the same coil, the shaft will become significantly harder to turn by hand.
-
If that shaft still spins easily, you have not identified a coil yet, and you must try a different combination of wires.
-
If you join together two wires that do result in the motor presenting resistance against turning, you can label these two wires as belonging to the same coil.
-
-
-
This procedure can be found on the OpenBuilds Documentation, for further information click here.
-
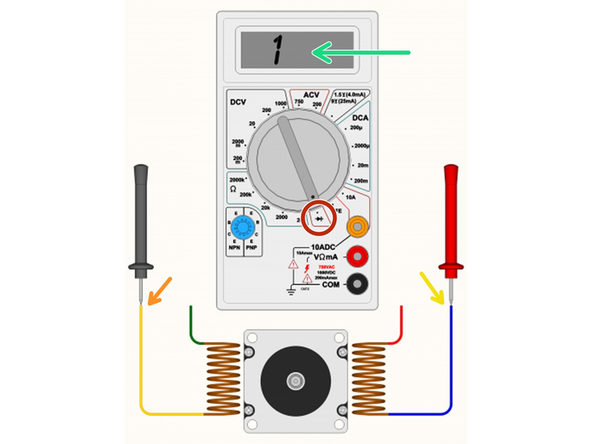
Set your multimeter to Continuity / Diode Test mode.
-
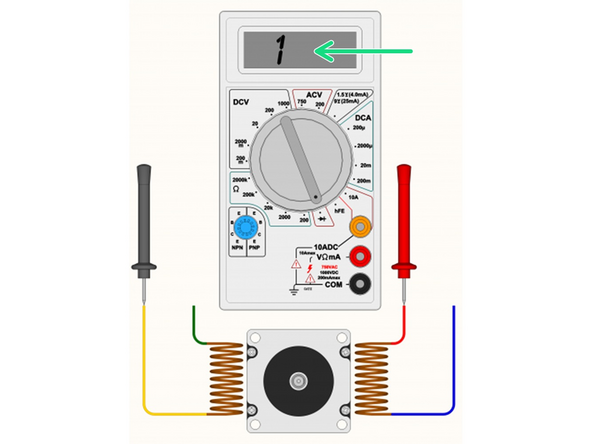
Start with any random wire, and touch that to the Black/Negative probe on your multimeter.
-
Select any remaining wire and touch it with the Red/Positive probe of your multimeter:
-
If the multimeter shows [1 or 0L] it means “no connection” - indicating we did not find a coil between these two wires. Some multimeters also “beep” when it does find a connection, so if there is no beep noise, it also could indicate the coil is not between these two wires.
-
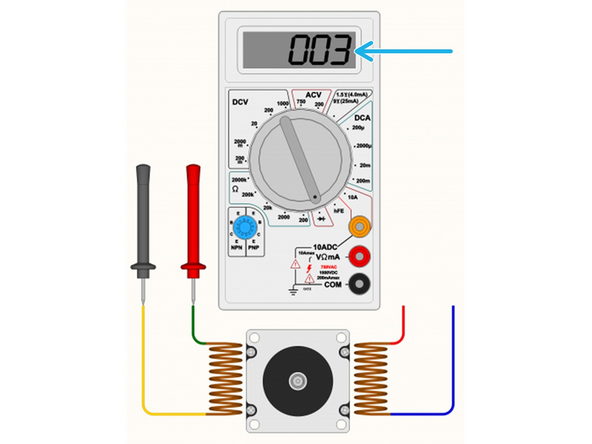
If you see a reading on the multimeter. The actual number does not matter too much, it's more important that it has some low value reading, and that the multimeter no longer displays [1] on the display. Some multimeters may “beep” when you have continuity between the wires (circuit completed by the coil in between).
-
Segment off these two wires and label them as belonging to a coil. It's important to not lose track of the coil pairs.
-
-
-
Xtension Connector - 4 Pin
-
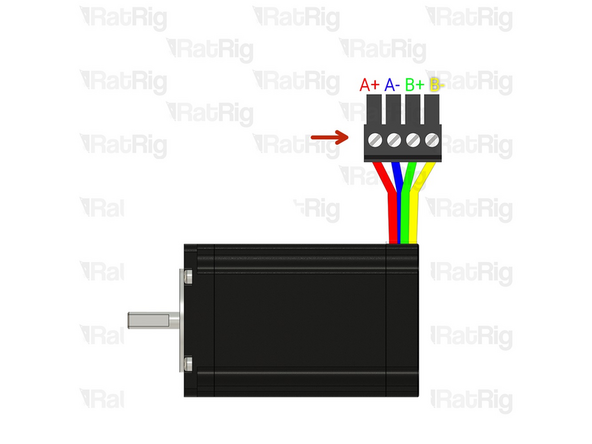
Insert an Xtension connector (male) onto the stepper wires. The previously identified coil pairs must be next to each other. They are now designated as A pair and B pair. The + and - don't really matter at this point as long as the coil ends are together.
-
Your stepper wire colours might be different, please proceed with the correct coil pairs for your set-up.
-
Repeat the coil identification step and this step for the remaining stepper motors.
-
-
-
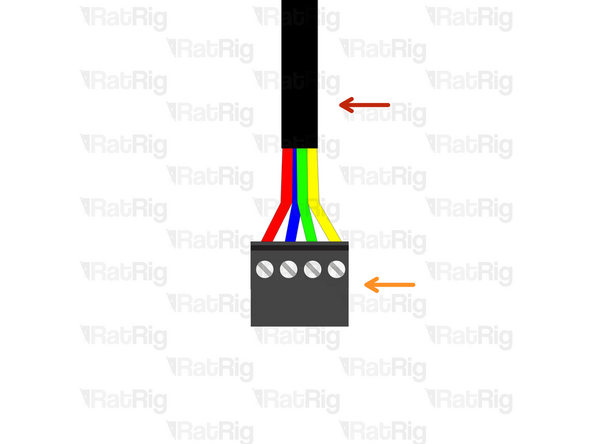
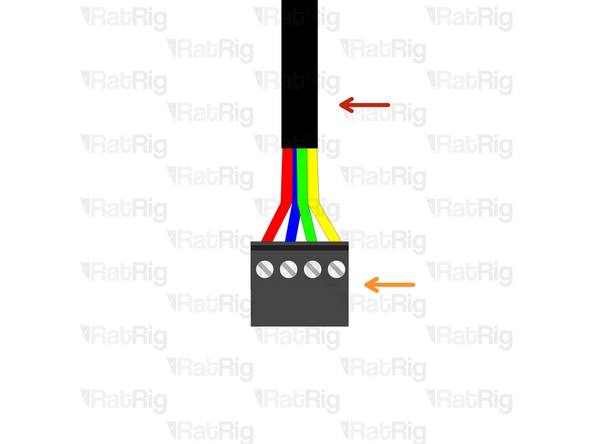
Prepare the 4 wire cable for the Z stepper motor.
-
4 Wire cable - [Entire length] (don't cut it)
-
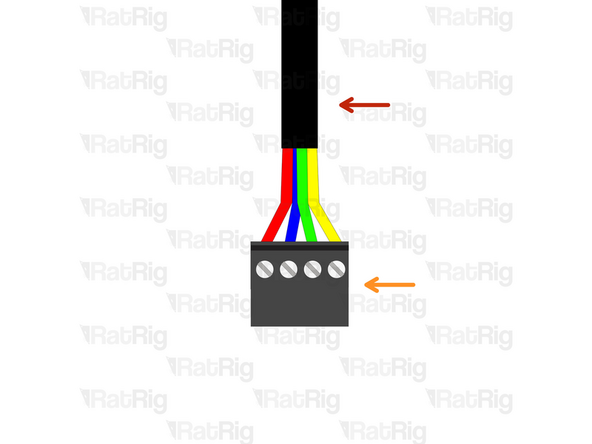
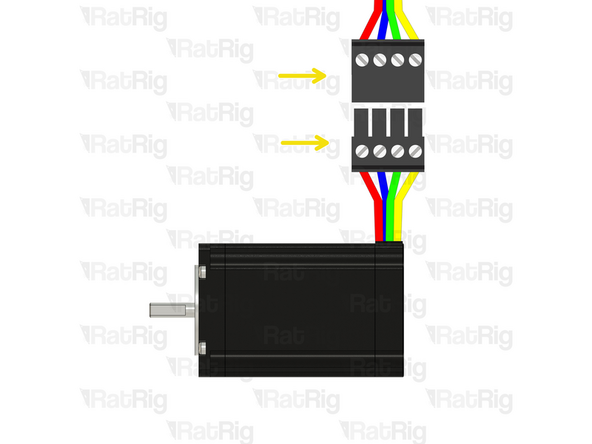
Insert an Xtension (female) connector on to the cable end.
-
Connect the extension to the stepper motor.
-
Make sure to follow the wire colour scheme to preserve the motor coil pairs.
-
Should the integrity of the motor coil pairs not be maintained, the motor will experience impaired operational functionality.
-
-
-
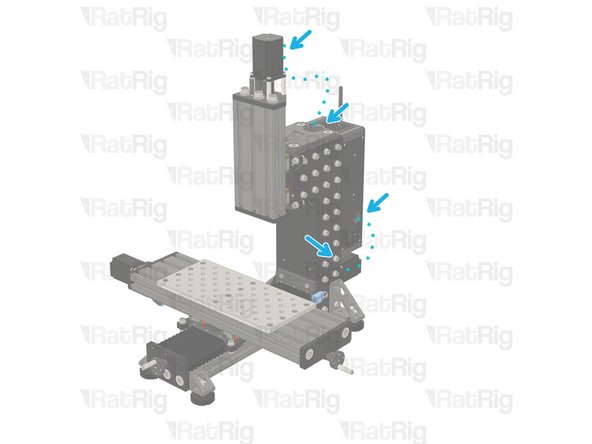
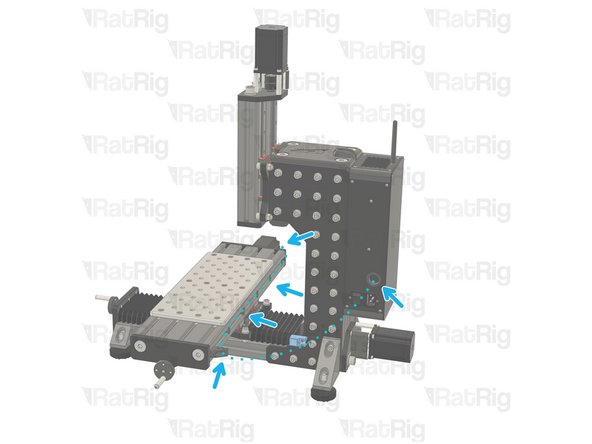
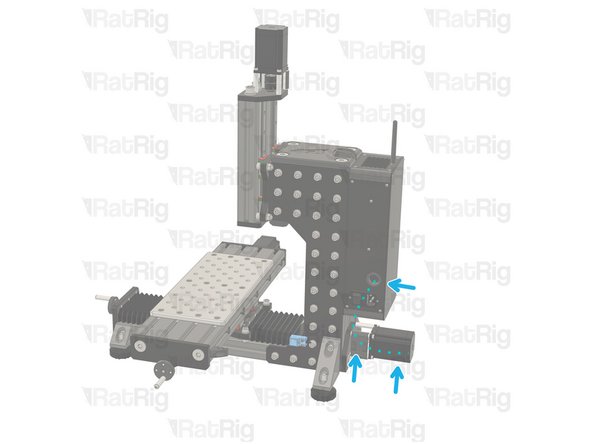
Route the Z-stepper wires as shown in the picture.
-
Use a zip tie to constrain it to the mill_stepper_cable_managment printed part, then through the mill_z_tower_top printed part and inside the Z tower. Finally exit at the rear, above the Y stepper and into the electronics enclosure or your desired location. Leave an extra 300mm (at least) to route it to the controller and crimp the connector.
-
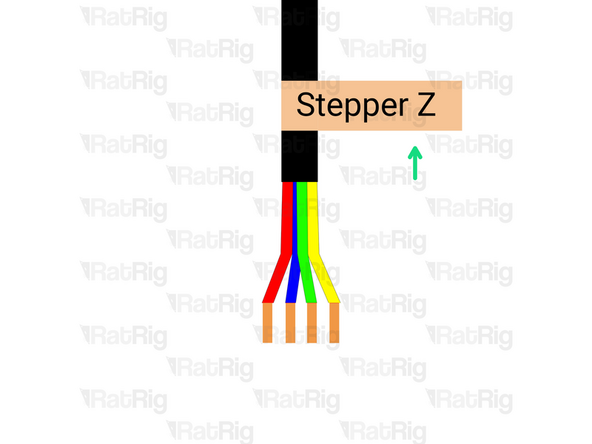
Cut the wires to the final length, double check if the cable has the appropriate length before cutting.
-
Label the cable at the end, with a piece of duct tape for example.
-
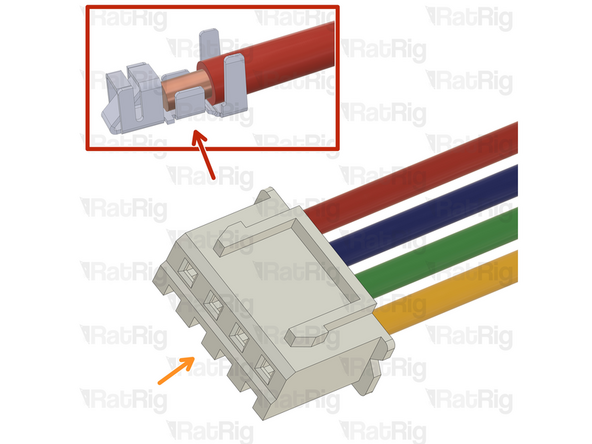
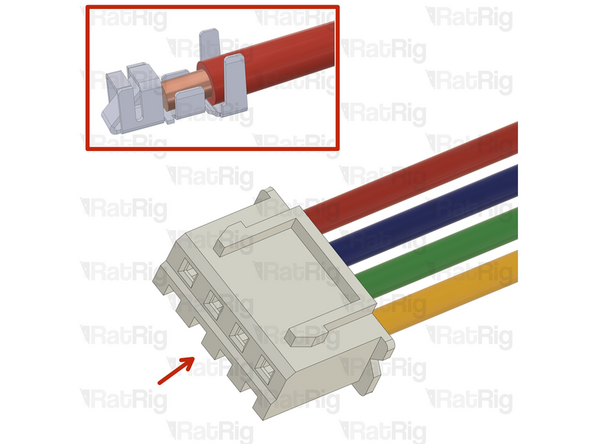
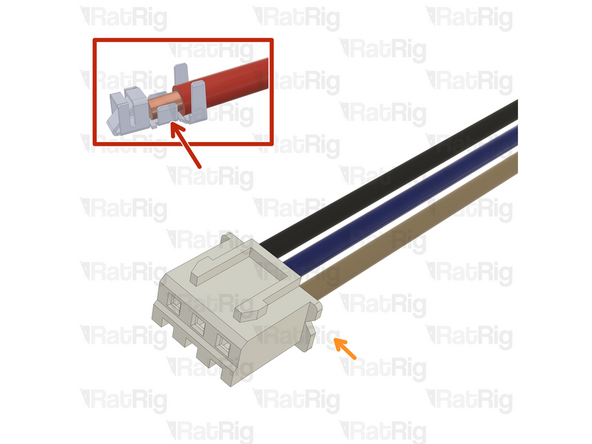
Crimp the JST-XH into the wires ensuring the crimp has a solid connection to the wire core.
-
Inset the crimps into the JST-XH housing, follow the wire colour scheme to preserve the motor coil pairs
-
Should the integrity of the motor coil pairs not be maintained, the motor will experience impaired operational functionality.
-
-
-
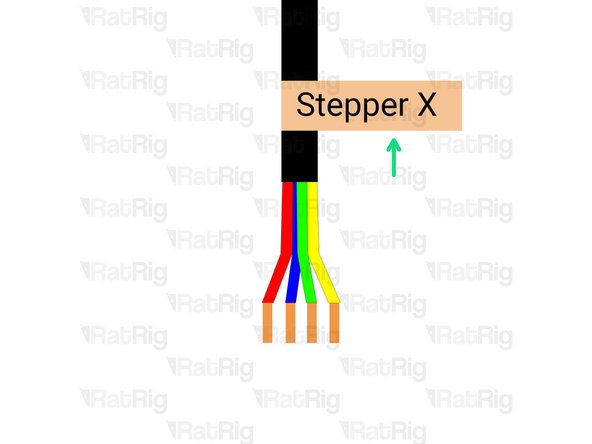
Prepare the 4 wire cable for the X stepper motor.
-
4 Wire cable - [Entire length] (don't cut it)
-
Insert an Xtension (female) connector on the cable end.
-
Connect the extension to the stepper motor.
-
Make sure to follow the wire colour scheme to preserve the motor coil pairs.
-
Should the integrity of the motor coil pairs not be maintained, the motor will experience impaired operational functionality.
-
-
-
Route the X-stepper wires as shown in the picture.
-
Use a zip tie to constrain it to the mill_stepper_cable_managment printed part, through the 4016 X gantry using the mill_4040_t_slot_clip to secure them. Exit at the mill_x_umbilical_mount printed part, and into the electronics enclosure or your desired location. Leave an extra 300mm (at least) to route it to the controller and crimp the connector.
-
Cut the cables to the final length, double check if the cable has the appropriate length before cutting.
-
Label the cable at the end, with a piece of duct tape for example.
-
Crimp the JST-XH into the wires ensuring the crimp has a solid connection to the wire core.
-
Inset the crimps into the JST-XH housing, follow the wire colour scheme to preserve the motor coil pairs
-
Should the integrity of the motor coil pairs not be maintained, the motor will experience impaired operational functionality.
-
-
-
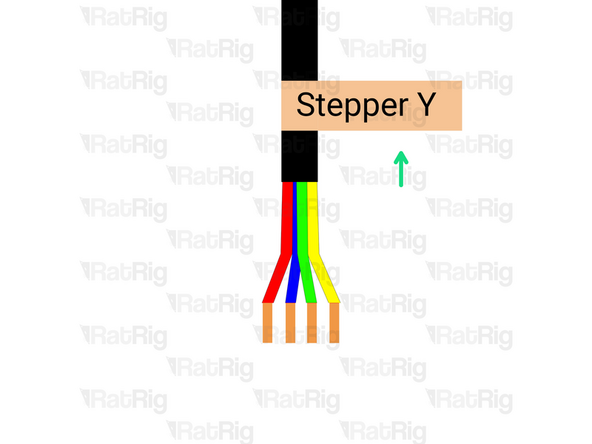
Prepare the 4 wire cable for the Y stepper motor.
-
4 Wire cable
-
Insert an Xtension (female) connector on the cable end.
-
Connect the extension to the stepper motor.
-
Make sure to follow the wire colour scheme to preserve the motor coil pairs.
-
Should the integrity of the motor coil pairs not be maintained, the motor will experience impaired operational functionality.
-
-
-
Route the Y-steppers cables as shown in the picture.
-
Use a zip tie to constrain it to the mill_stepper_cable_managment printed part, and into the electronics enclosure or your desired location. Leave an extra 300mm (at least) to route it to the controller and crimp the connector.
-
Cut the cables to the final length, double check if the cable has the appropriate length before cutting.
-
Label the cable at the end, with a piece of duct tape for example.
-
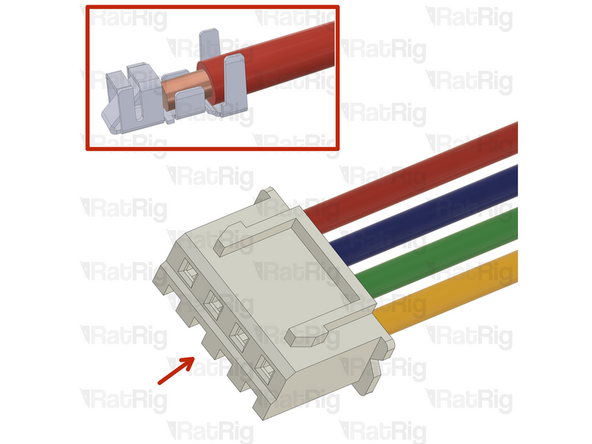
Crimp the JST-XH into the wires ensuring the crimp has a solid connection to the wire core.
-
Inset the crimps into the JST-XH housing, follow the wire colour scheme to preserve the motor coil pairs
-
Should the integrity of the motor coil pairs not be maintained, the motor will experience impaired operational functionality.
-
-
-
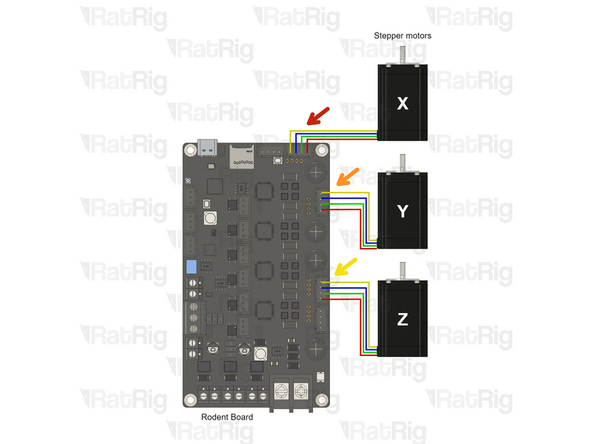
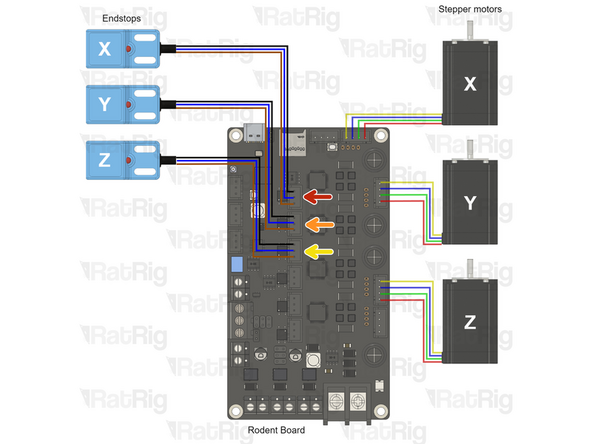
Insert the stepper motor connectors in the Rodent controller:
-
Insert the X stepper in the top connector as shown.
-
Insert the Y stepper in the middle connector as shown.
-
Insert the Z stepper in the lower connector as shown.
-
The colour of the wires does not matter, as long as the coil pair is maintained.
-
-
-
The endstops in the kit come with sufficiently long cables for use with the standard electronics enclosure, so there is no need to extend the wires. However, if you wish to install the electronics in a different location, the kit includes wire extensions and connectors to facilitate this.
-
3x SN04-N2 Proximity Sensor
-
3x JST-XH 3Pins
-
-
-
Route the X endstop cable as shown in the picture.
-
Use a zip tie to constrain it to the mill_stepper_cable_managment printed part, through the 4016 X gantry using the mill_4040_t_slot_clip to secure them. Exit at the mill_x_umbilical_mount printed part, and into the electronics enclosure or your desired location. Leave an extra 300mm (at least) to route it to the controller and crimp the connector.
-
Cut the cables to the final length, double check if the cable has the appropriate length before cutting.
-
Label the cable at the end, with a piece of duct tape for example.
-
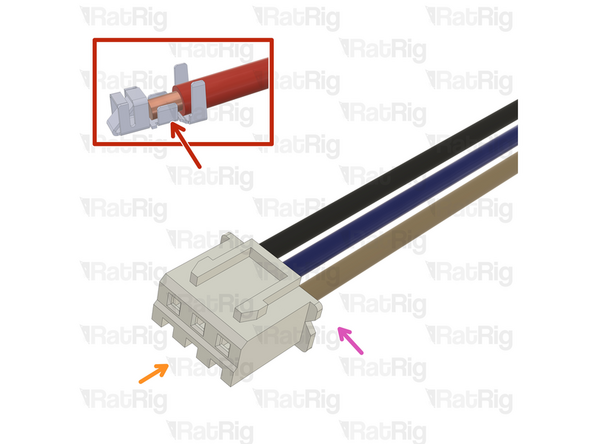
Crimp the JST-XH into the wires ensuring the crimp has a solid connection to the wire core.
-
1x JST-XH 3Pins
-
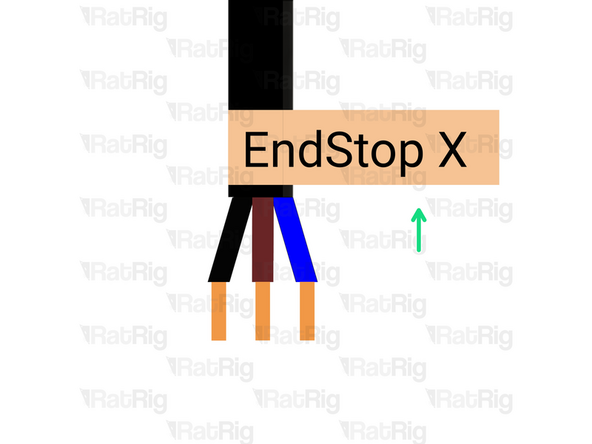
Inset the crimps into the JST-XH housing, follow the shown wire colour scheme.
-
-
-
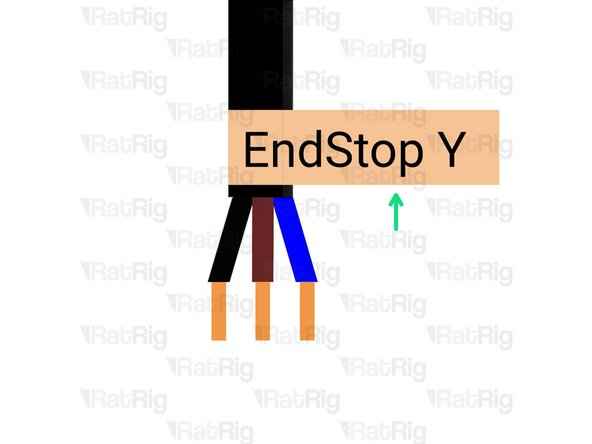
Route the Y endstop cable as shown in the picture.
-
Cut the cables to the final length, double check if the cable has the appropriate length before cutting.
-
Label the cable at the end, with a piece of duct tape for example.
-
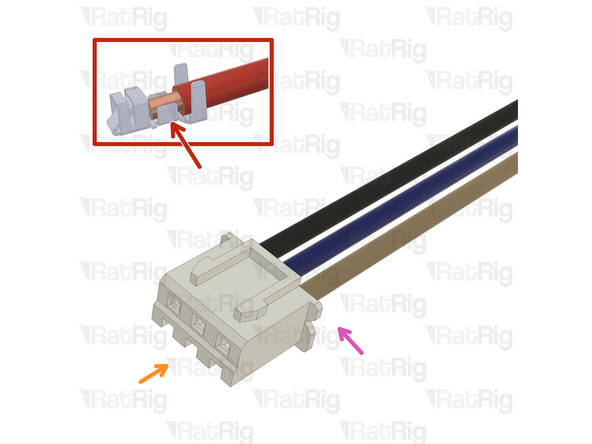
Crimp the JST-XH into the wires ensuring the crimp has a solid connection to the wire core.
-
1x JST-XH 3Pins
-
Inset the crimps into the JST-XH housing, follow the shown wire colour scheme.
-
-
-
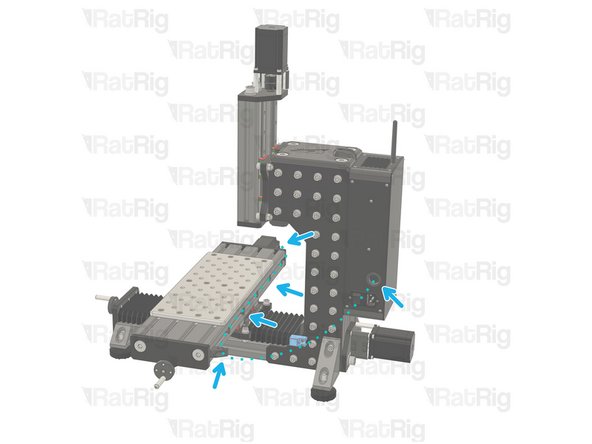
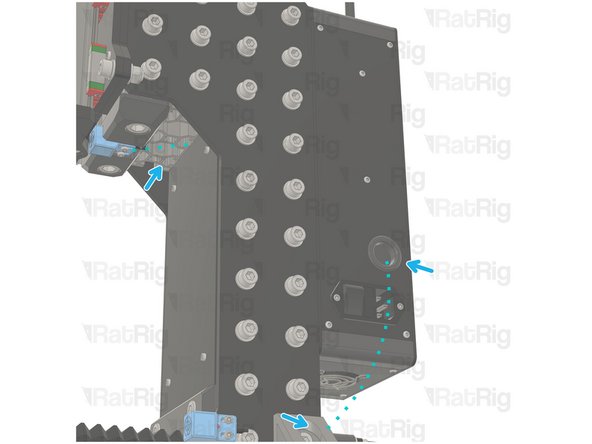
Route the X endstop cable as shown in the picture.
-
Use a zip tie to constrain it to the mill_z_endstop_mount printed part, then through the extrusion slot. Finally exit at the rear, above the Y stepper and into the electronics enclosure or your desired location. Leave an extra 300mm (at least) to route it to the controller and crimp the connector.
-
Cut the cables to the final length, double check if the cable has the appropriate length before cutting.
-
Label the cable at the end, with a piece of duct tape for example.
-
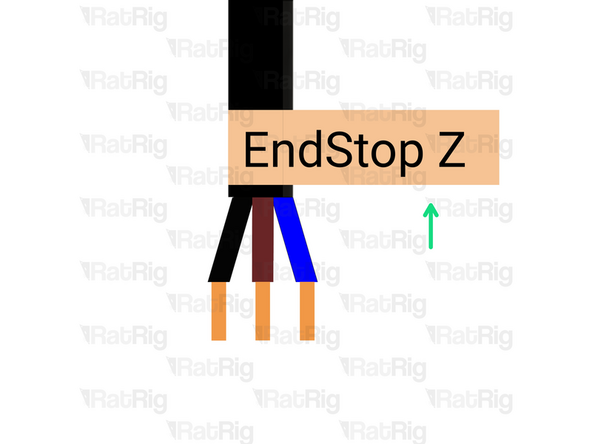
Crimp the JST-XH into the wires ensuring the crimp has a solid connection to the wire core.
-
1x JST-XH 3Pins
-
Inset the crimps into the JST-XH housing, follow the shown wire colour scheme.
-
-
-
Insert the endstop connectors in the Rodent controller:
-
Insert the X endstop in the top connector as shown.
-
Insert the Y endstop in the middle connector as shown.
-
Insert the Z endstop in the bottom connector as shown.
-
-
-
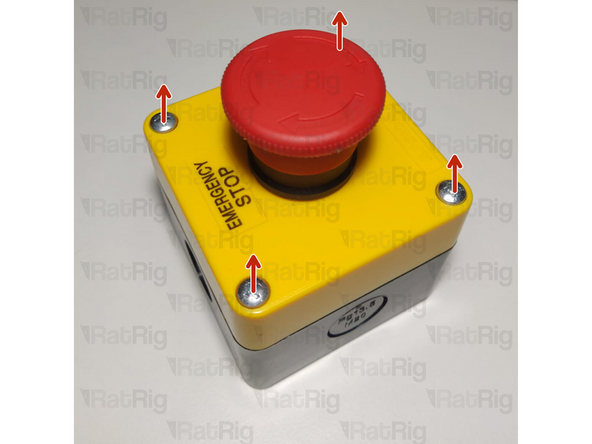
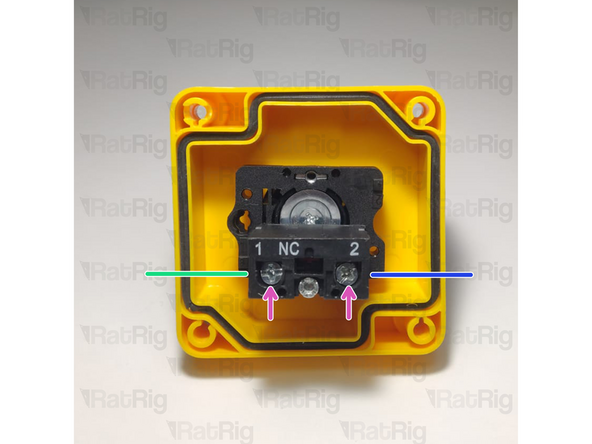
Open the emergency button by removing the four screws
-
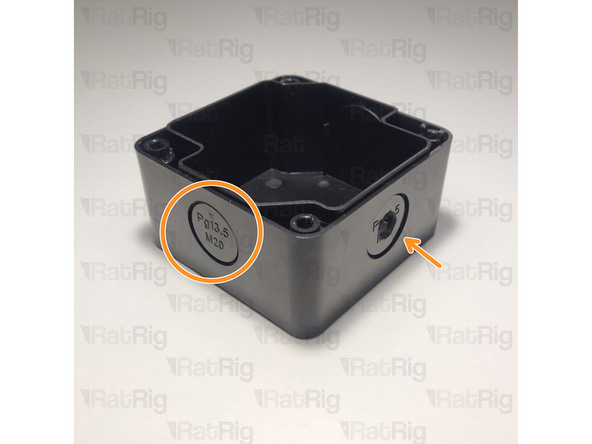
Open a hole on the emergency button body, either by snapping a removable disk or drilling a hole
-
Prepare wire included in the E-Stop button box by cutting it in half. This must be long enough to connect the button to the PSU and Rodent.
-
Insert one wire on one side
-
Tighten the screw to hold it in place
-
Insert another wire to the other side
-
Tighten the screw to hold it in place
-
Make sure to feed the wires through the hole made previously and close the emergency button with the four screws.
-
-
-
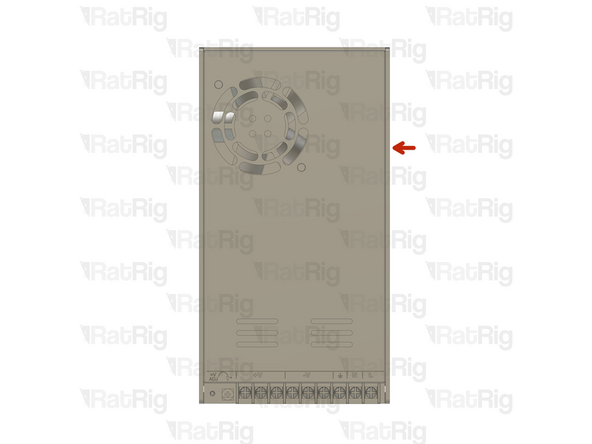
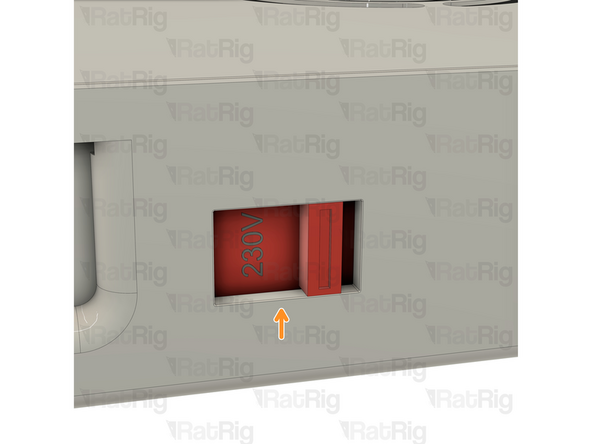
On the right side of the power supply there is a switch.
-
This switch needs to be set to the mains voltage in your country. Either 115V (most common in the USA / Canada), or 230V.
-
Setting this to the incorrect input voltage may destroy the power supply and anything connected to it.
-
Keep in mind that milling is a very messy job and debris may fly into the power supply. This could cause it to fail or catch fire! Please be aware!
-
-
-
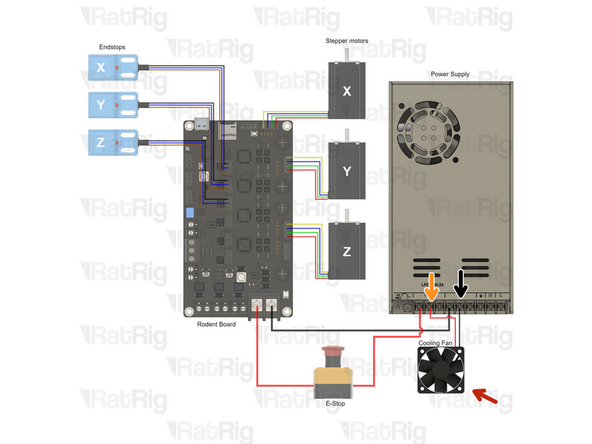
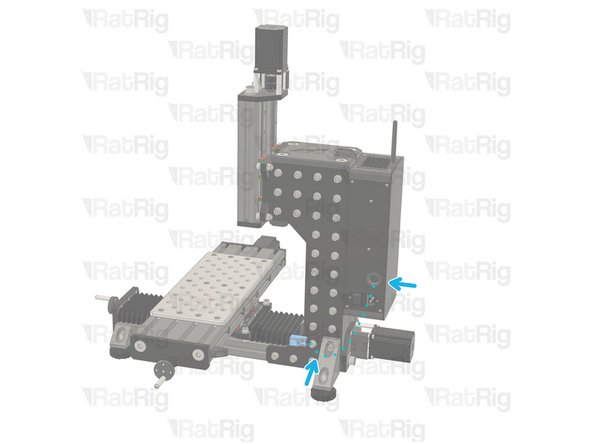
Connect the wire previously installed on the E-Stop button to one of the +V on the Power supply and the other end to the +V [right slot] on the Rodent.
-
Connect the [Wire - DC Power - 16AWG Black - 160mm] to one of the GND on the Power supply and the other end to the GND [left slot] on the Rodent.
-
-
-
Connect the 5015 axial fan directly to the PSU
-
Connect the red wire to the +V terminal on the PSU.
-
Connect the red wire to the -V terminal on the PSU
-
If you are installing the fan on the standard electronics enclosure, keep the label facing the inside of the enclosure, ensuring it pushes fresh air inside.
-
-
-
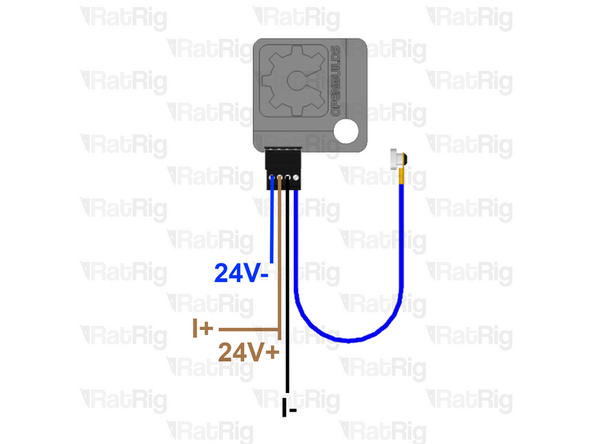
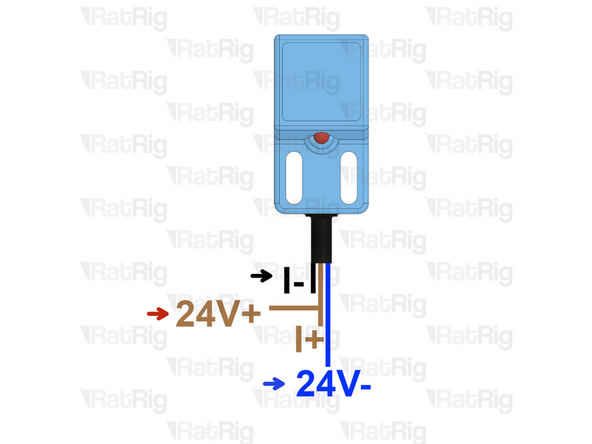
The probe has three wires, if your colours are different, please check the supplier datasheet.
-
If you are using a XYZ probe from OpenBuilds, the connector on the probe has
-
Blue - 24V- (GND)
-
Brown or Red - 24V+ and I+ terminals.
-
Black (signal wire)- I- terminal
-
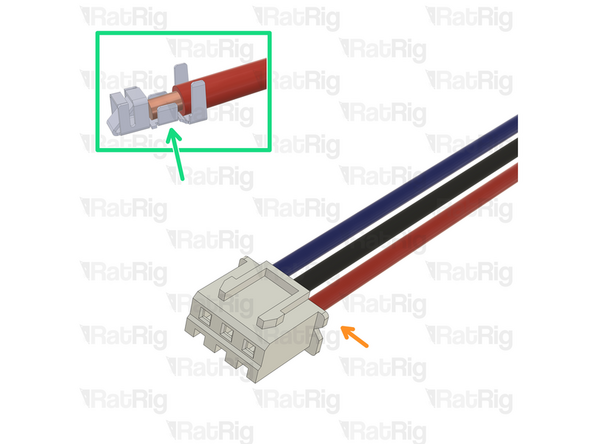
Crimp the JST-XH into the wires ensuring the crimp has a solid connection to the wire core.
-
1x JST-XH 3Pins
-
Inset the crimps into the JST-XH housing, to follow the shown wire colour scheme.
-
-
-
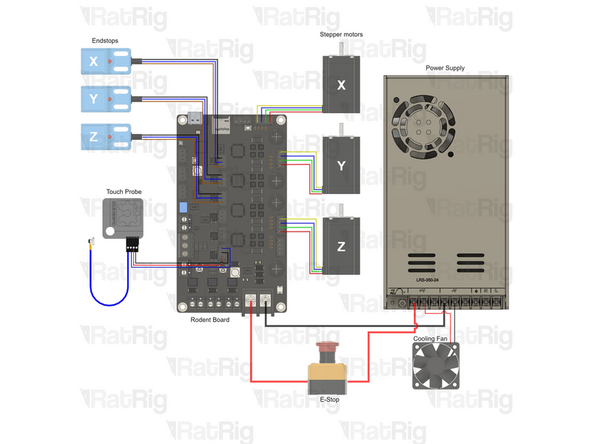
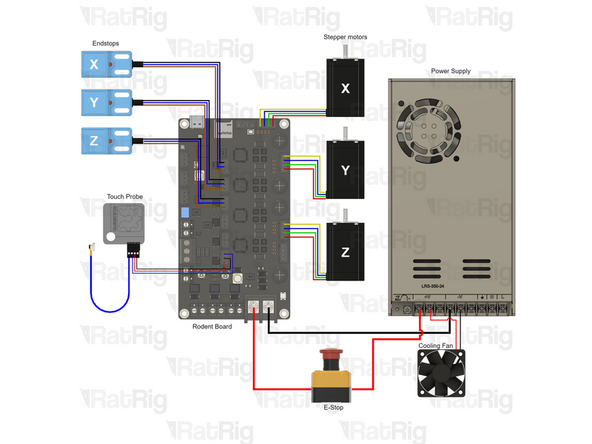
Check all the cables. The connections must look like the picture. Take your time to ensure all steps are correct before powering the machine on, any mistakes may cause component malfunction or failure.
-
Almost done!
Finish Line


![4 Wire cable - [Entire length] (don't cut it)](https://d3t0tbmlie281e.cloudfront.net/igi/ratrig/uN2MCjRLSxK2W6xu.medium)
![4 Wire cable - [Entire length] (don't cut it)](https://d3t0tbmlie281e.cloudfront.net/igi/ratrig/xPh1CkRLcmIfLl52.medium)
![Connect the wire previously installed on the E-Stop button to one of the +V on the Power supply and the other end to the +V [right slot] on the Rodent.](https://d3t0tbmlie281e.cloudfront.net/igi/ratrig/2lUOFkRLSuCDUrQL.medium)
