Introduction
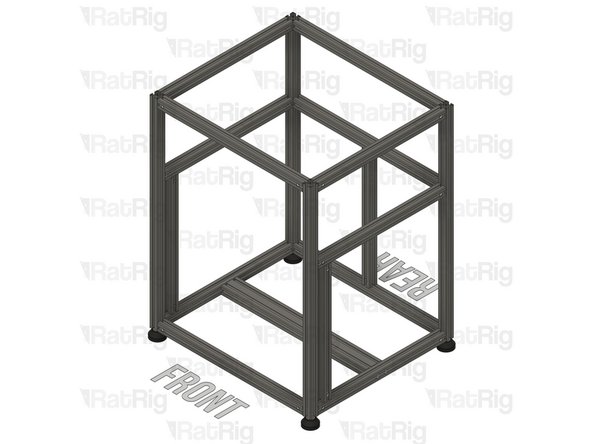
Please note: All measurements provided in this guide are based upon building a 300x300 V-Core 4.
If you are building a machine of a different size, the following adjustments can be made to the stated extrusion lengths:
- 400x400: Add 100mm
- 500x500: Add 200mm
It is strongly recommended to assemble the frame on a known flat surface (such as a solid table, work surface or similar). Assembling the frame on a carpeted floor, tile floor or other non-flat surface, can cause the finished frame to not be square. This can cause issues with print quality and performance.
-
-
This step is intended to demonstrate how the quick connectors operate, the actual assembly process begins in Step 6
-
T-Nut Pin
-
O-Ring
-
Housing
-
Set Screw
-
-
-
This step is intended to demonstrate how the quick connectors operate, the actual assembly process begins in Step 6
-
The T-Nut pin is responsible for pulling the two extrusions together and ensuring a firm connection- It should be inserted inside the housing as shown.
-
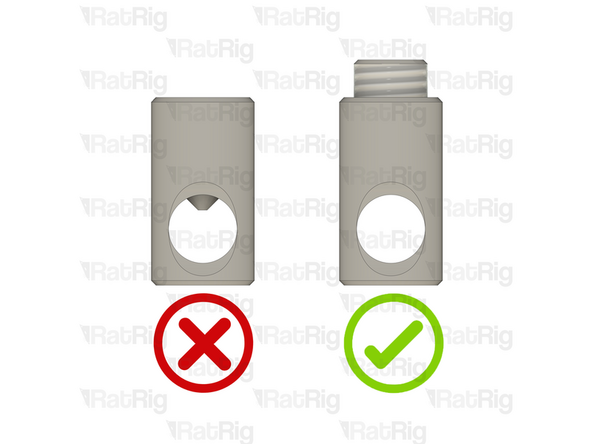
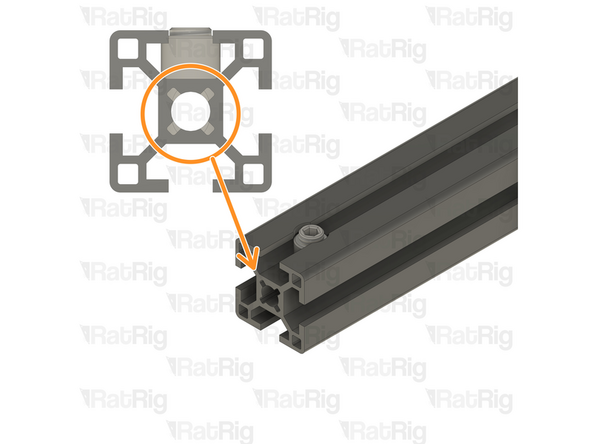
The T-nut pin groove must be below the set-screw.
-
Upon tightening the set screw, its end will exert pressure on the sidewall of the T-Nut pin groove, causing it to close.
-
-
-
This step is intended to demonstrate how the quick connectors operate, the actual assembly process begins in Step 6
-
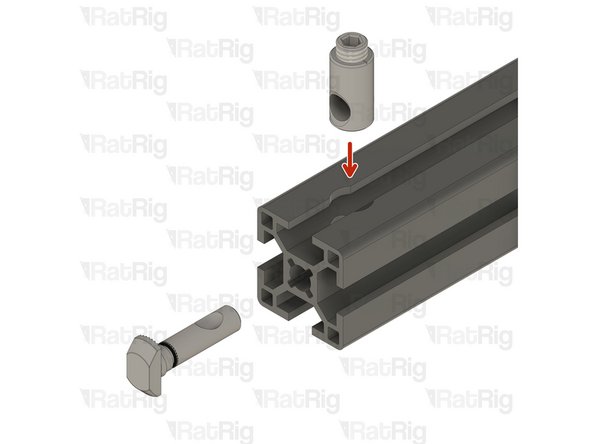
Before inserting the housing and set screw into the extrusions, make sure the housing hole is free from the set screw.
-
Insert the housing + set screw on the extrusion, with the set screw facing up.
-
The hole on the housing should be aligned with the hole in the extrusion so that the T-Nut pin can be inserted next.
-
-
-
This step is intended to demonstrate how the quick connectors operate, the actual assembly process begins in Step 6
-
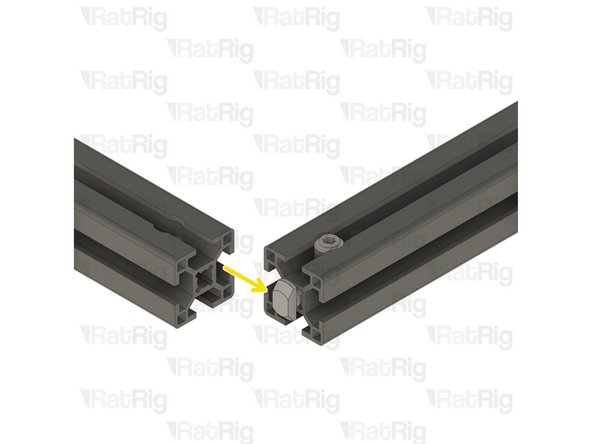
Insert the T-nut pin into the extrusion and quick connector housing
-
The T-nut pin groove must be facing the same side as the set screw, if not, the quick connector won't work.
-
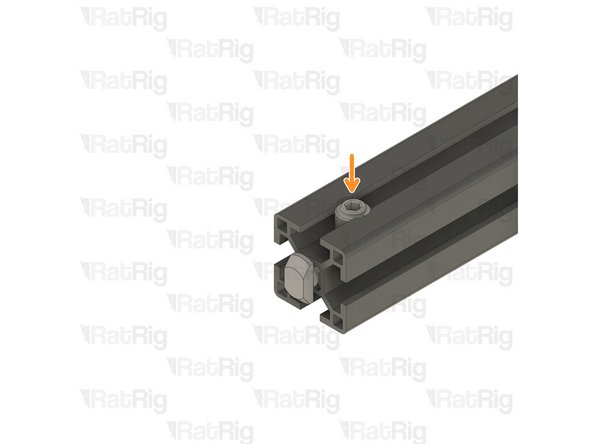
Carefully thread the set screw in, just enough to hold the t-nut pin in the assembly. Do not tighten it, the goal is just to ensure the t-nut pin doesn't fall.
-
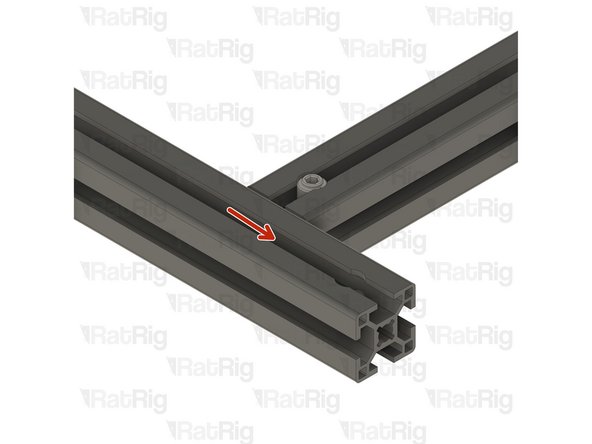
When connecting two extrusions, carefully slide the T-nut pin inside the slot of the other extrusion.
-
-
-
This step is intended to demonstrate how the quick connectors operate, the actual assembly process begins in Step 6
-
When sliding the extrusion to the right place, be careful, and take it slowly so as to not damage the extrusion coating.
-
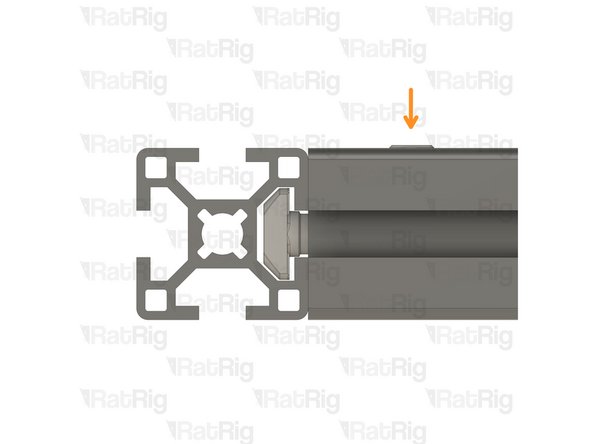
Once the extrusions are in the right place, you can firmly tighten the set screw.
-
The T-nut pin will be pulled inside and firmly attached the extrusions.
-
Always verify the strength of the connection between the extrusions. If the connection is not strong, loosen the set screw, ensure that the T-nut pin groove is positioned below the set screw, and reconnect the extrusions.
-
-
-
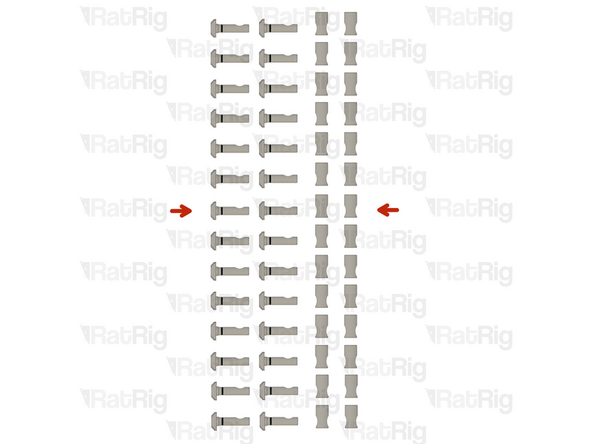
Prepare 28x Quick connectors
-
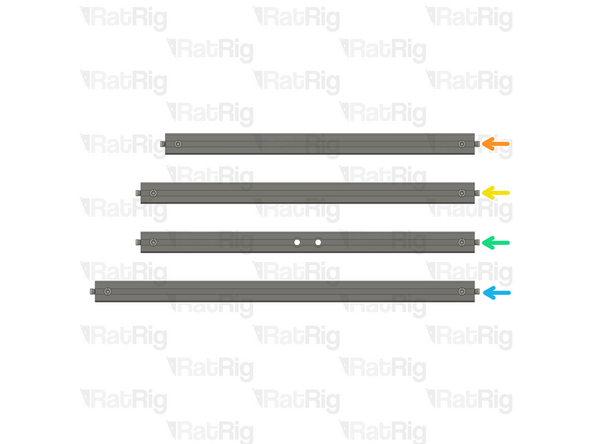
Prepare the following extrusions with quick connectors on both sides:
-
3x T-Slot 3030 Milled extrusion- 440mm
-
4x T-Slot 3030 Milled extrusion - 475mm
-
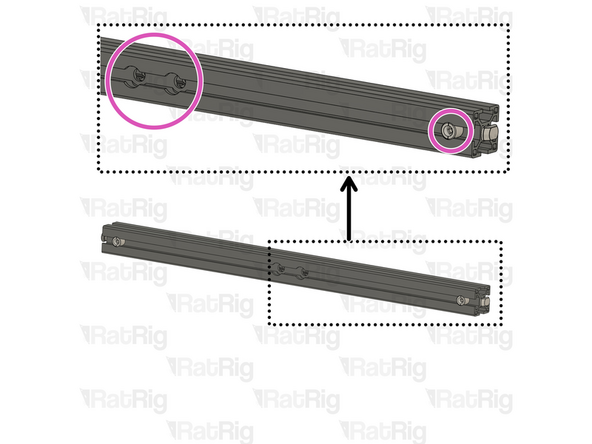
2x T-Slot 3030 Milled - 475mm with 2xM8 holes
-
Ensure the quick connector set screws are facing the same side as the M8 screw head holes.
-
5x T-Slot 3030 Milled extrusion - 540mm
-
If you are building a machine of a different size, add 100mm to all extrusions for the V-Core 4 400 and 200mm for the V-Core 4 500
-
-
-
If you are building a different size V-Core 4, add the following lengths to the extrusions:
-
V-Core 4 400 - add 100mm to all extrusions
-
V-Core 4 500 - add 200mm to all extrusions
-
-
-
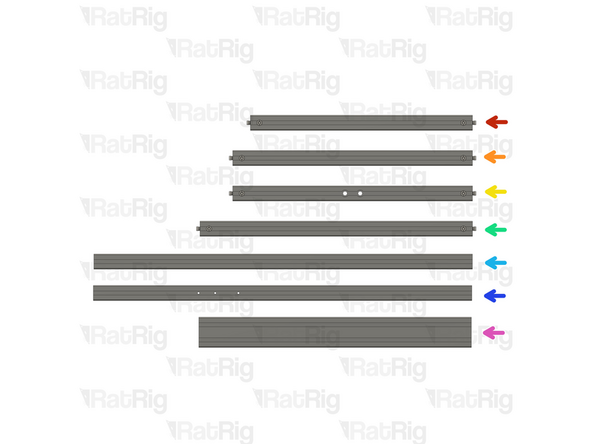
Have the following extrusions and Frame jig near you, to proceed with the frame assembly:
-
3x T-Slot 3030 Milled extrusion- 440mm with 2 quick connectors
-
4x T-Slot 3030 Milled extrusion - 475mm with 2 quick connectors
-
2x T-Slot 3030 Milled extrusion - 475mm with 2 quick connectors and 2xM8 holes
-
5x T-Slot 3030 Milled extrusion - 540 with 2 quick connectors
-
2x T-Slot 3030 Milled extrusion - 750mm
-
2x T-Slot 3030 Milled extrusion - 750mm with 3xM4 holes
-
1x T-Slot 3060 extrusion - 540mm
-
-
-
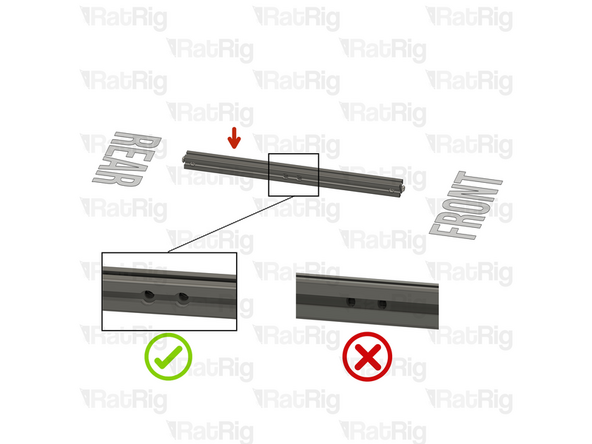
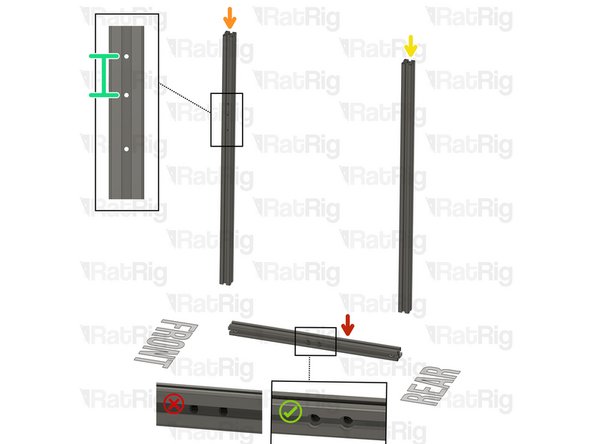
T-Slot 3030 Milled extrusion - 2xM8 - 475mm
-
Ensure the M8 holes are oriented in the correct direction
-
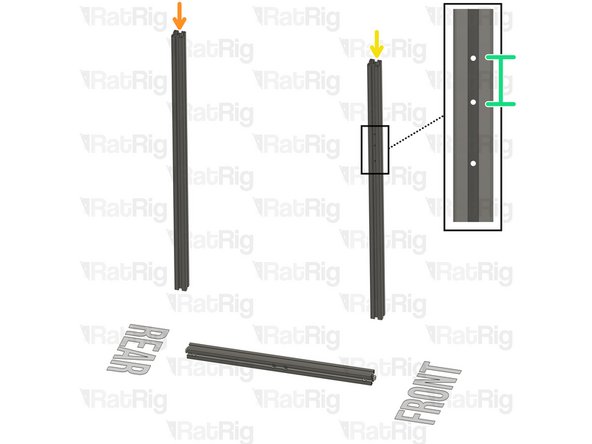
T-Slot 3030 Milled extrusion - 750mm
-
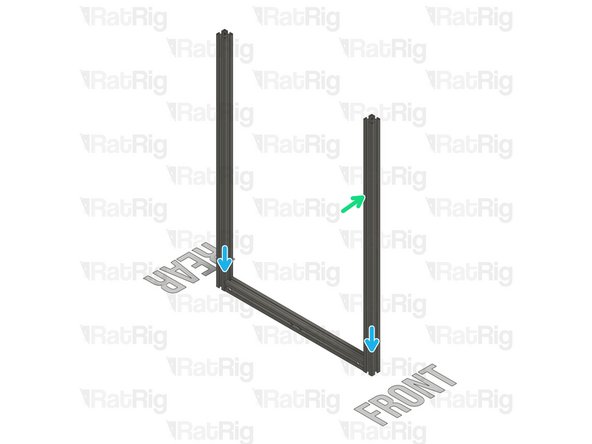
T-Slot 3030 Milled - 750mm with 3xM4 holes
-
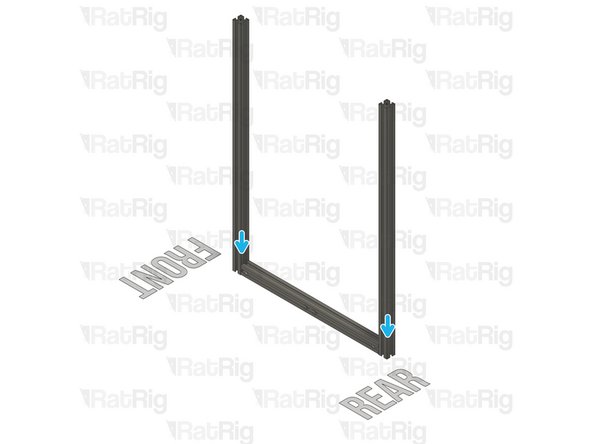
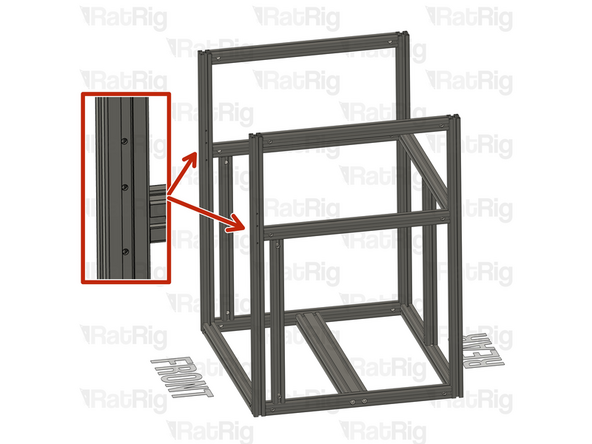
Assemble this extrusion on the front of the frame, with the 3xM4 holes oriented as shown. Be aware of the extrusion orientation, the small spacing between the M4 holes must be upwards.
-
Align and insert the T-nut pin on the extrusion slot.
-
When sliding the extrusion to the right place, be careful, and take it slowly to not damage the extrusion coating.
-
Don't use ball-end hex-tools! Those can easily damage the quick connectors.
-
-
-
Lay the assembly on a flat surface, this is crucial to ensure a square frame
-
Good flat surfaces: Poured concrete, glass, stone countertop
-
Bad flat surfaces: Carpeted floor, tile floor, concrete surface
-
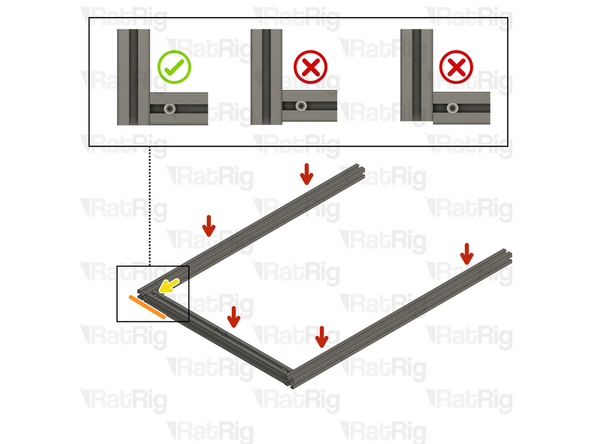
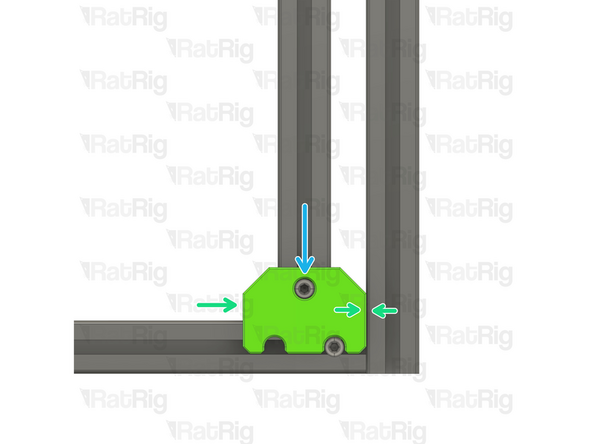
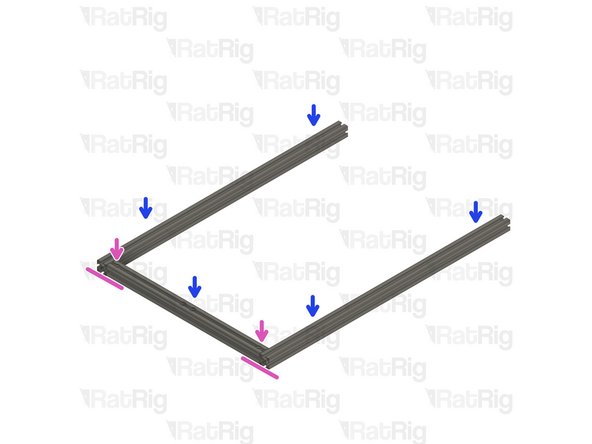
Align the extrusions - make sure they are flush
-
Tighten the quick connectors to secure the extrusions together.
-
Always verify the strength of the connection between the extrusions. If the connection is not strong, loosen the set screw, ensure that the T-nut pin groove is positioned below the set screw, and reconnect the extrusions.
-
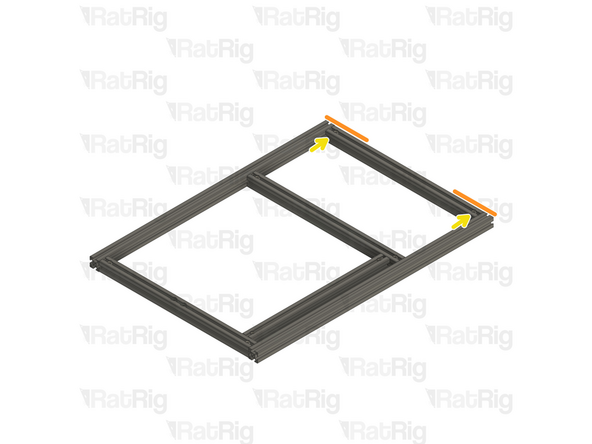
Build Tip: You can use a spare 3030 extrusion or the Engineer Square to help align the assembly
-
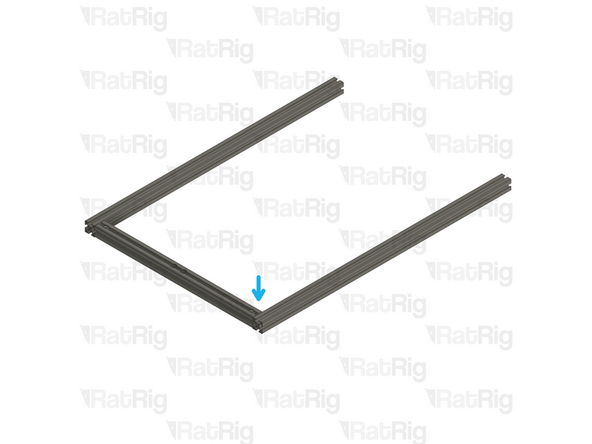
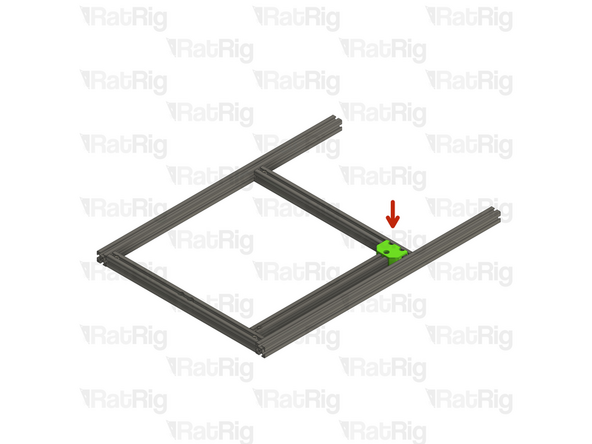
Repeat the previous steps and tighten the marked quick connector.
-
-
-
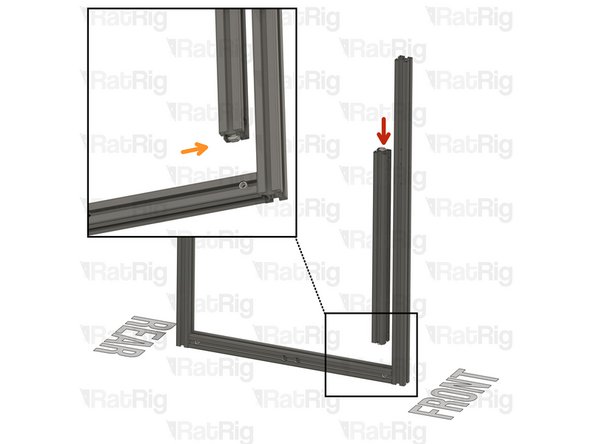
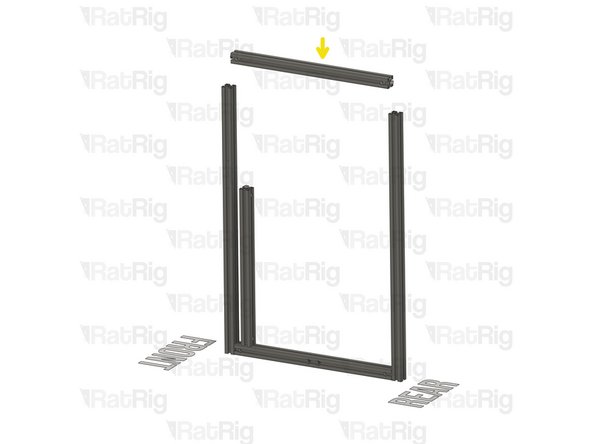
T-Slot 3030 Milled extrusion - 440mm
-
Align the T-nut pin with the bottom extrusion slot
-
Insert the T-nut pin in the bottom extrusion slot.
-
T-Slot 3030 Milled extrusion - 475mm
-
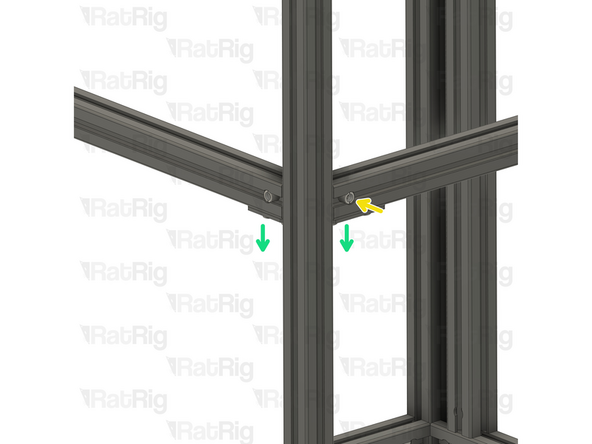
Insert the extrusion on the assembly, making sure the T-nut pins are aligned with the side extrusion slots.
-
When sliding the extrusion to the right place, be careful, and take it slowly so as to not damage the extrusion coating.
-
-
-
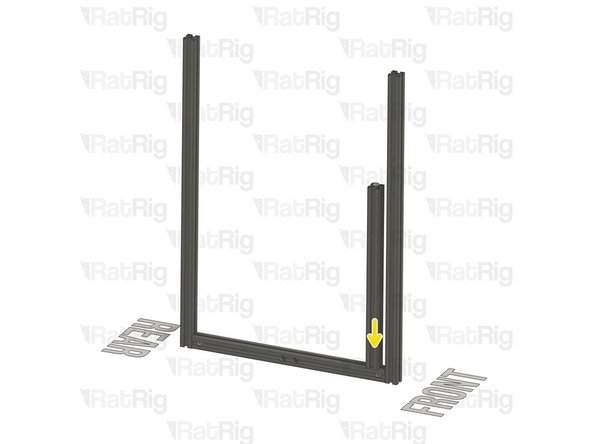
Align the T-Slot 3030 Milled extrusion - 475mm to have the T-nut pin inside the slot.
-
Carefully rotate the T-Slot 3030 Milled extrusion - 440mm 90º so the quick connectors face the side shown in the picture.
-
When sliding the extrusion to the right place, be careful, and take it slowly so as to not damage the extrusion coating.
-
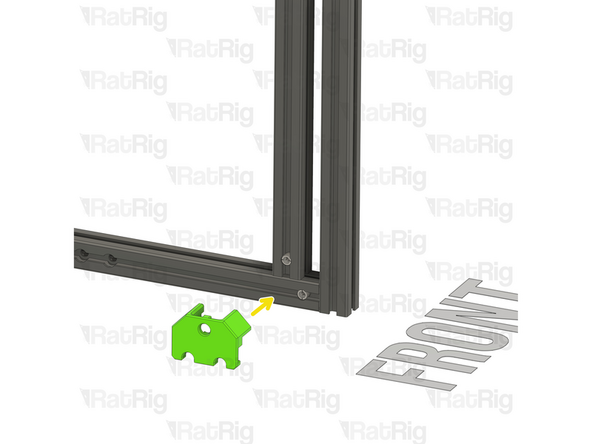
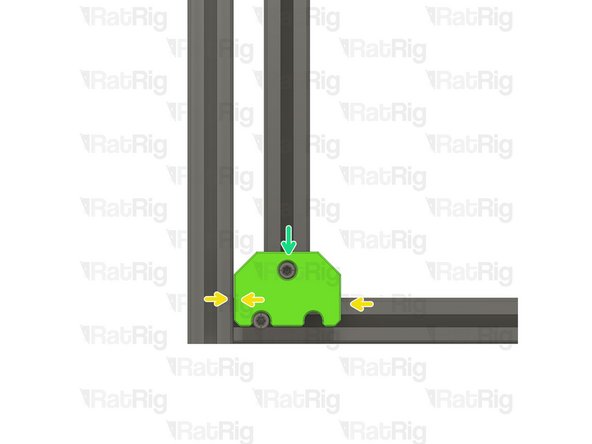
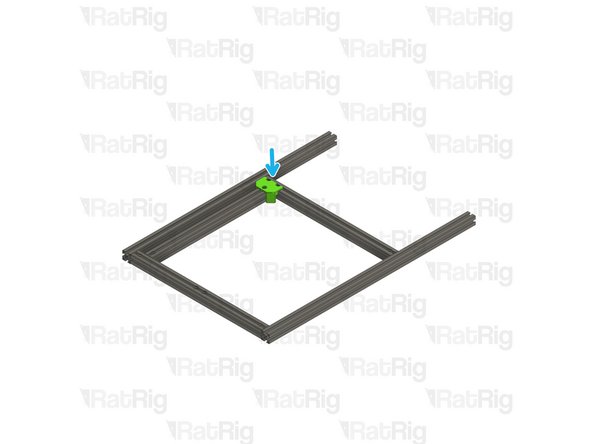
Insert the frame jig on the assembly, as shown.
-
-
-
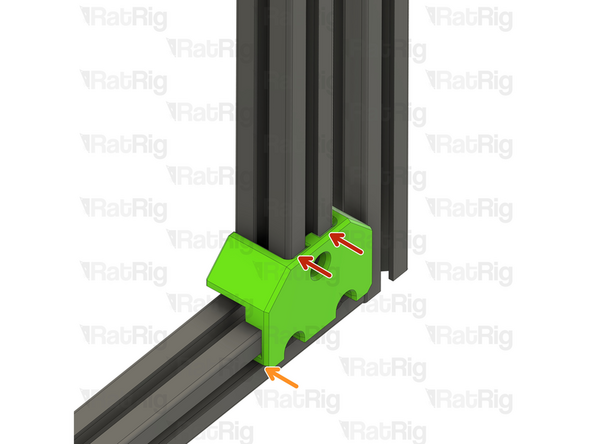
Make sure the frame jig is inserted all the way and completely flush with the extrusion
-
Ensure the frame jig is inside the bottom extrusion slot.
-
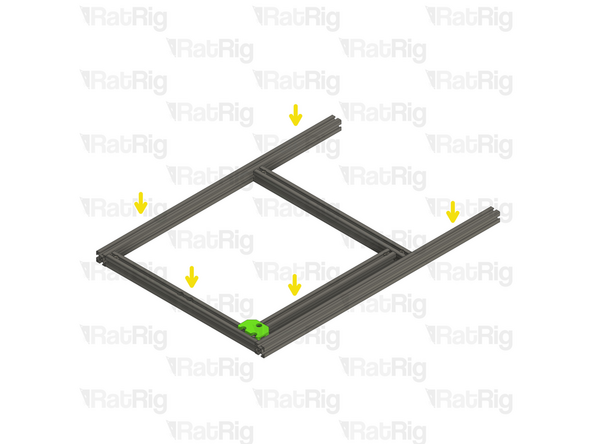
Lay the assembly on a flat surface
-
Push the frame jig to the right, eliminating any play between the frame jig and the extrusions
-
Tighten the quick connector to secure the extrusions together.
-
Always verify the strength of the connection between the extrusions. If the connection is not strong, loosen the set screw, ensure that the T-nut pin groove is positioned below the set screw, and reconnect the extrusions.
-
-
-
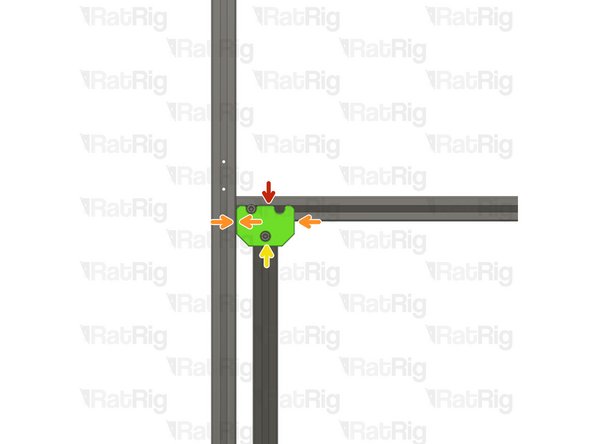
Insert the frame jig on the assembly, as shown.
-
Make sure the frame jig is inserted all the way and completely flush with the extrusion
-
Ensure the frame jig is inside the extrusion slot.
-
Push the frame jig to the right, eliminating any play between the frame jig and the extrusions
-
Tighten the quick connectors to secure the extrusions together.
-
Always verify the strength of the connection between the extrusions. If the connection is not strong, loosen the set screw, ensure that the T-nut pin groove is positioned below the set screw, and reconnect the extrusions.
-
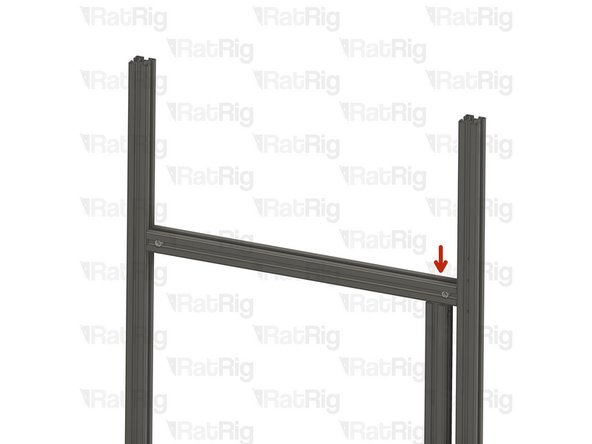
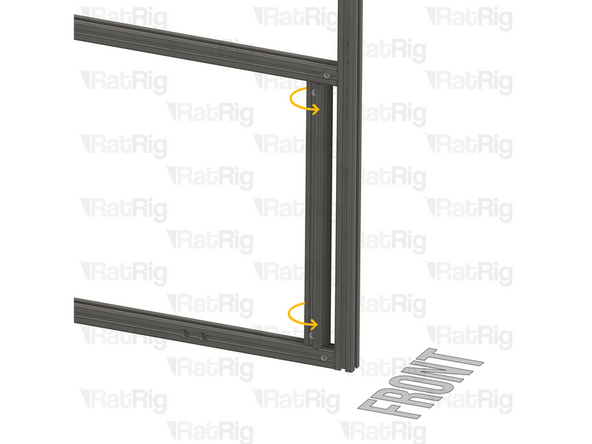
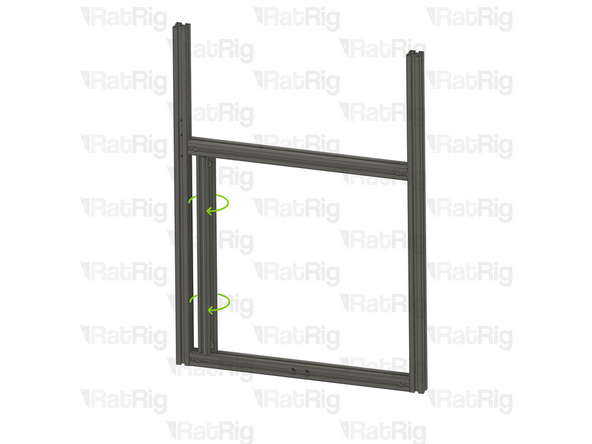
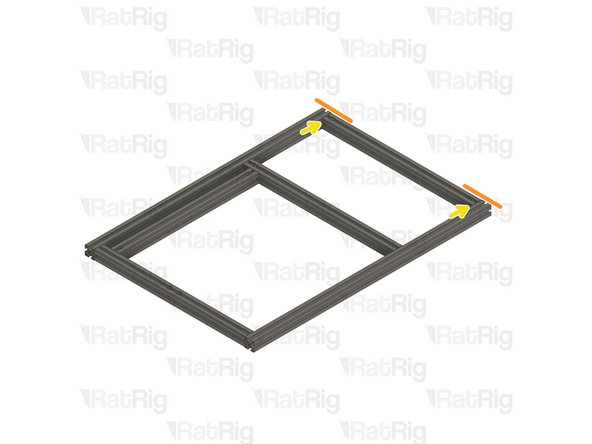
Ensure the distance between the extrusion and the top of the assembly is 250mm
-
Tighten the quick connectors to secure the extrusions together.
-
-
-
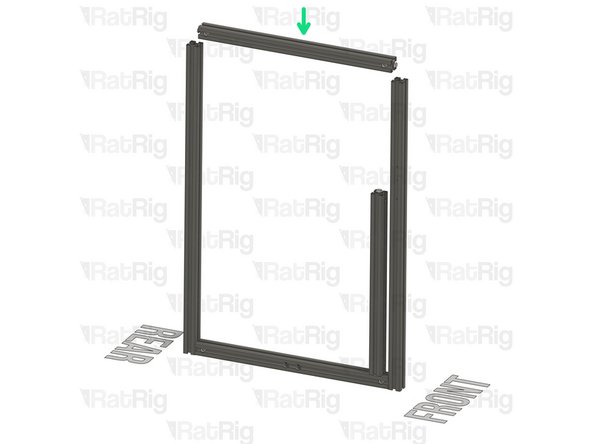
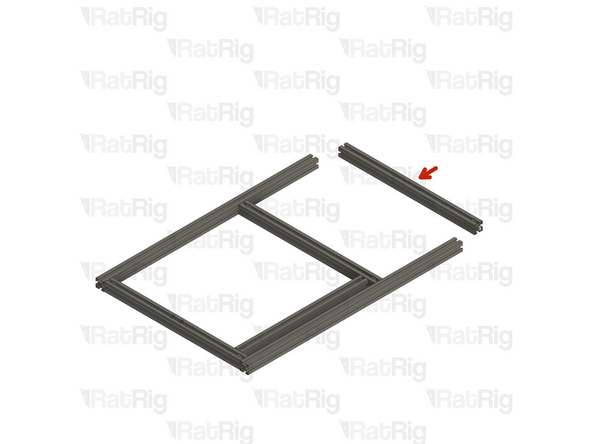
T-Slot 3030 Milled extrusion - 475mm
-
Insert the extrusion on the assembly, making sure the T-nut pins are aligned with the side extrusion slots.
-
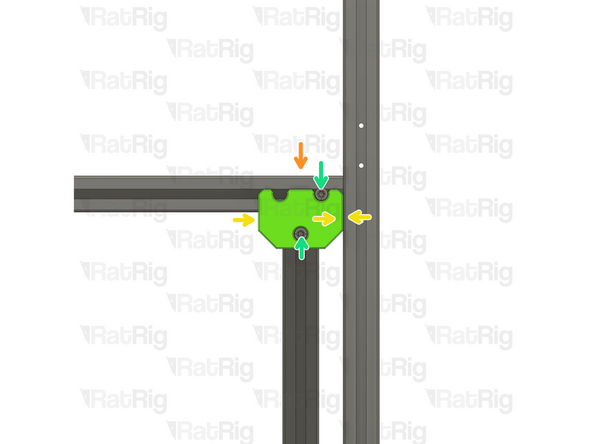
Align the extrusions - make sure they are flush
-
Check Step 10 on how to correctly align the extrusions
-
Tighten the quick connectors to secure the extrusions together.
-
Always verify the strength of the connection between the extrusions. If the connection is not strong, loosen the set screw, ensure that the T-nut pin groove is positioned below the set screw, and reconnect the extrusions.
-
-
-
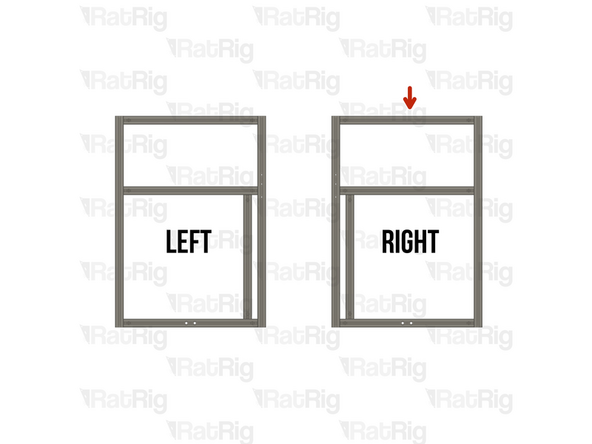
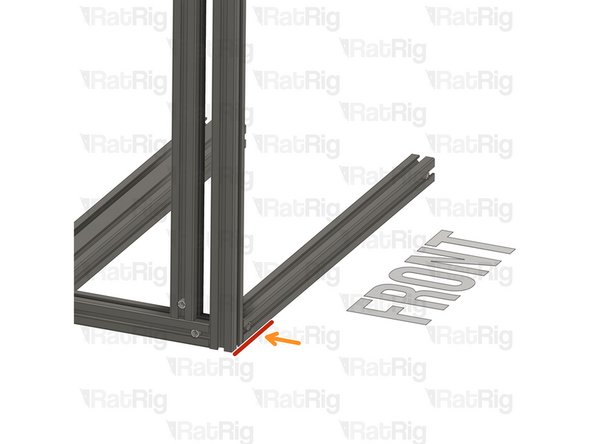
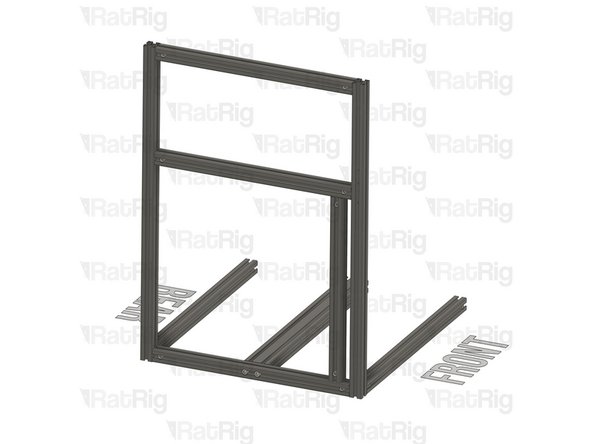
These next steps will help you put together the right side frame part. The frames are like reflections of each other. Even though the next steps are brief, you can find more detailed info in Steps 9-15.
-
Follow the designated steps carefully to ensure the new assembly is mirrored
-
-
-
T-Slot 3030 Milled extrusion - 2xM8 - 475mm
-
Ensure the M8 holes are oriented in the correct direction
-
T-Slot 3030 Milled - 750mm with 3xM4 holes
-
T-Slot 3030 Milled - 750mm
-
Assemble this extrusion on the front of the frame, with the 3xM3 holes facing the sides. Be aware of the extrusion orientation, the small spacing between the M3 holes must be upwards.
-
Align and insert the T-nut pin on the extrusion slot.
-
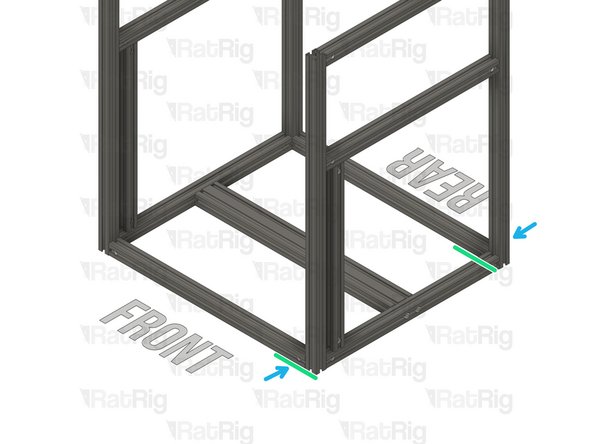
Lay the assembly on a flat surface, this is crucial to ensure a square frame
-
Align and tighten the marked extrusions and quick connectors - Refer to Step 10
-
-
-
T-Slot 3030 Milled extrusion - 440mm
-
Align and insert the T-nut pin in the bottom extrusion slot.
-
T-Slot 3030 Milled extrusion - 475mm
-
Carefully rotate the T-Slot 3030 Milled extrusion - 440mm 90º so the quick connectors face the side shown in the picture.
-
When sliding the extrusion to the right place, be careful, and take it slowly so as to not damage the extrusion coating.
-
-
-
Lay the assembly on a flat surface
-
Insert the frame jig on the assembly, make sure the frame jig is inserted all the way and completely flush with the extrusion
-
Push the frame jig to the left, eliminating any play between the frame jig and the extrusions
-
Tighten the quick connector to secure the extrusions together.
-
Always verify the strength of the connection between the extrusions. If the connection is not strong, loosen the set screw, ensure that the T-nut pin groove is positioned below the set screw, and reconnect the extrusions.
-
Insert the frame jig on the assembly, make sure the frame jig is inserted all the way and completely flush with the extrusion
-
-
-
Ensure the frame jig is inside the extrusion slot.
-
Push the frame jig to the left, eliminating any play between the frame jig and the extrusions
-
Tighten the quick connector to secure the extrusions together.
-
Always verify the strength of the connection between the extrusions. If the connection is not strong, loosen the set screw, ensure that the T-nut pin groove is positioned below the set screw, and reconnect the extrusions.
-
Ensure the distance between the extrusion and the top of the assembly is 250mm
-
Tighten the quick connectors to secure the extrusions together.
-
-
-
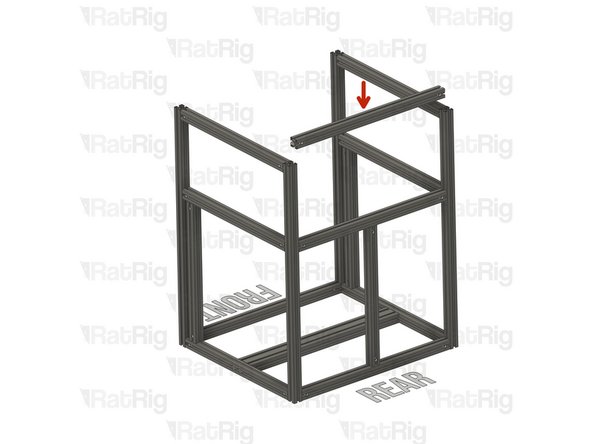
T-Slot 3030 Milled extrusion - 475mm
-
Insert the extrusion on the assembly, making sure the T-nut pins are aligned with the side extrusion slots.
-
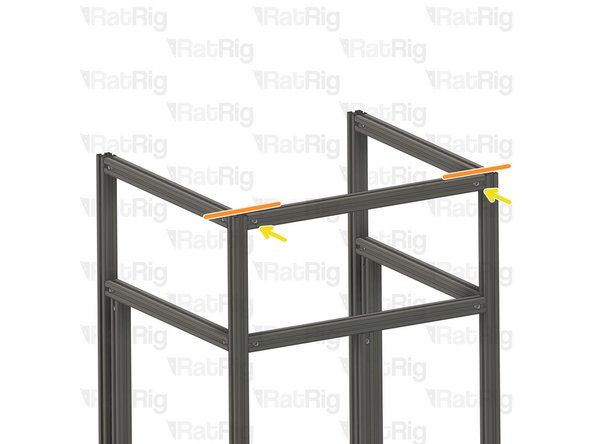
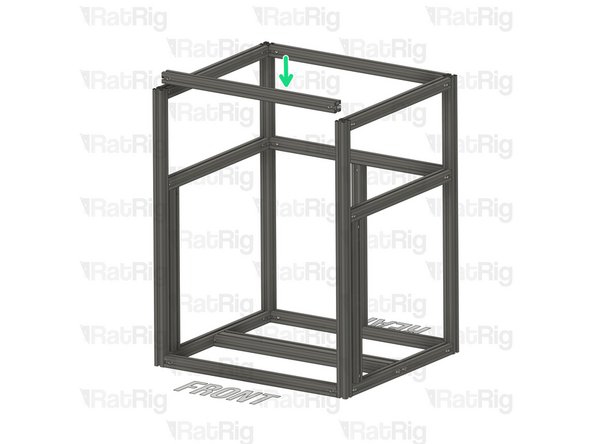
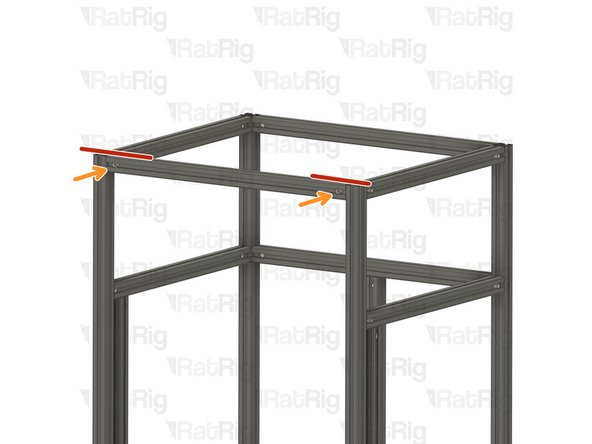
Align the extrusions - make sure they are flush
-
Check Step 10 on how to correctly align the extrusions
-
Tighten the quick connectors to secure the extrusions together.
-
Always verify the strength of the connection between the extrusions. If the connection is not strong, loosen the set screw, ensure that the T-nut pin groove is positioned below the set screw, and reconnect the extrusions.
-
-
-
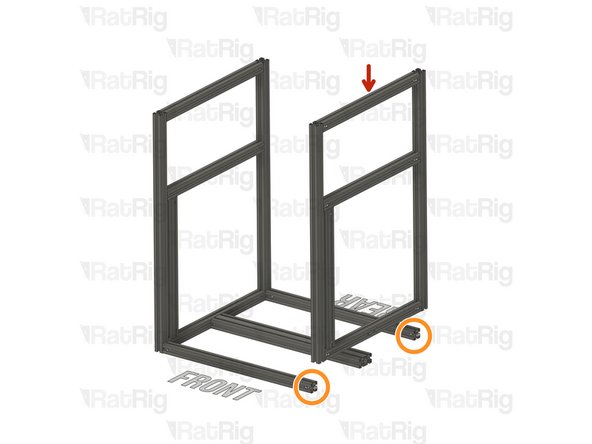
Left Side frame sub-assembly
-
T-Slot 3060 extrusion - 540mm
-
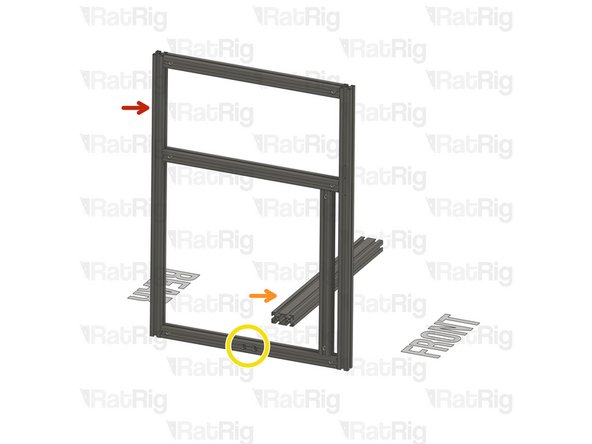
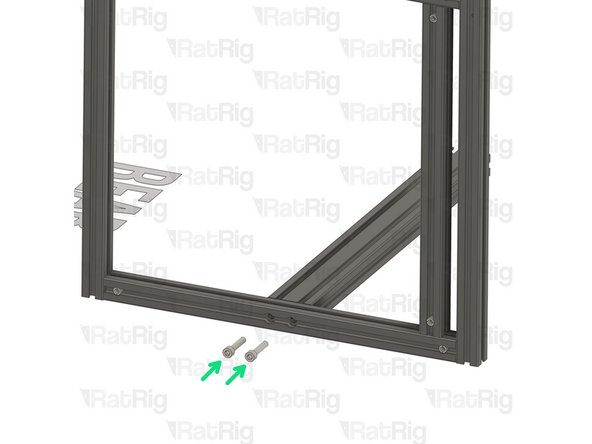
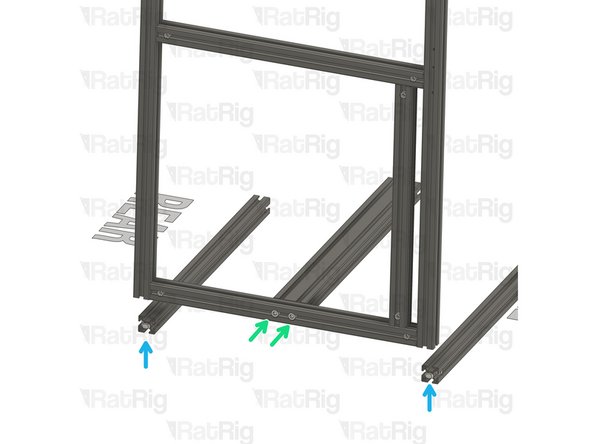
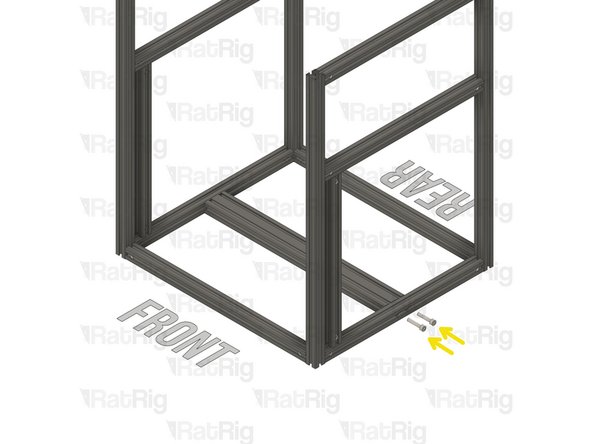
Align the extrusion with the two holes on the side frame sub-assembly bottom extrusion
-
2x M8x40 Cap Head screw
-
Insert them into the sub frame assembly and tighten them to the T-Slot 3060 extrusion - 540mm
-
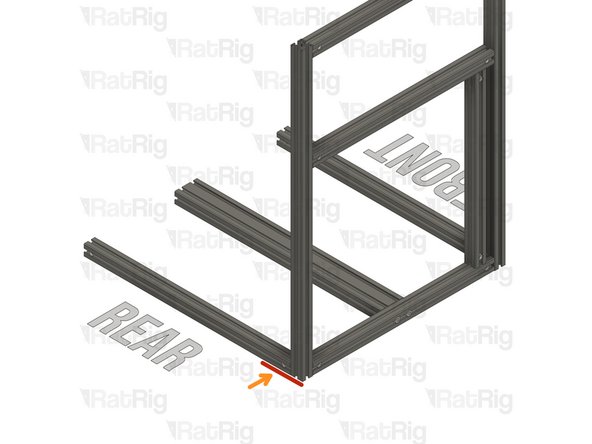
2x T-Slot 3030 Milled extrusion - 540mm
-
Insert the extrusion on the assembly, making sure the T-nut pins are aligned with the side extrusion slots.
-
When sliding the extrusion to the right place, be careful, and take it slowly so as to not damage the extrusion coating.
-
-
-
Place the assembly on a flat surface, as to ensure all extrusions are correctly aligned.
-
Tighten the quick connectors to secure the extrusions together.
-
Always verify the strength of the connection between the extrusions. If the connection is not strong, loosen the set screw, ensure that the T-nut pin groove is positioned below the set screw, and reconnect the extrusions.
-
-
-
Right Side frame sub-assembly
-
Insert the extrusion on the assembly, making sure the T-nut pins are aligned with the side extrusion slots.
-
When sliding the extrusion to the right place, be careful, and take it slowly so as to not damage the extrusion coating.
-
Align the extrusion with the two holes on the side frame sub-assembly bottom extrusion
-
Insert 2x M8x40 Cap Head screw into the sub frame assembly and tighten to the T-Slot 3060 extrusion - 540mm
-
Place the assembly on a flat surface, as to ensure all extrusions are correctly aligned.
-
Tighten the quick connectors to secure the extrusions together.
-
Always verify the strength of the connection between the extrusions. If the connection is not strong, loosen the set screw, ensure that the T-nut pin groove is positioned below the set screw, and reconnect the extrusions.
-
-
-
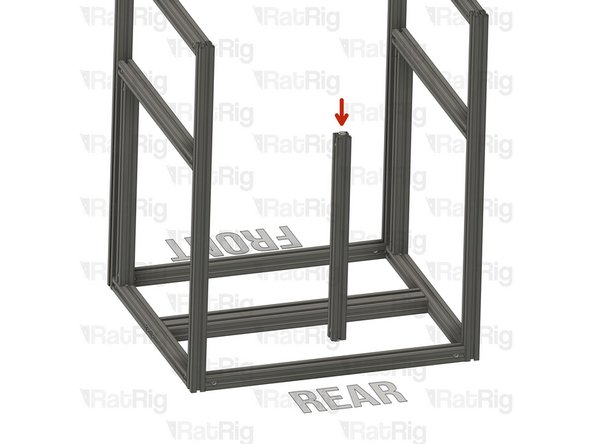
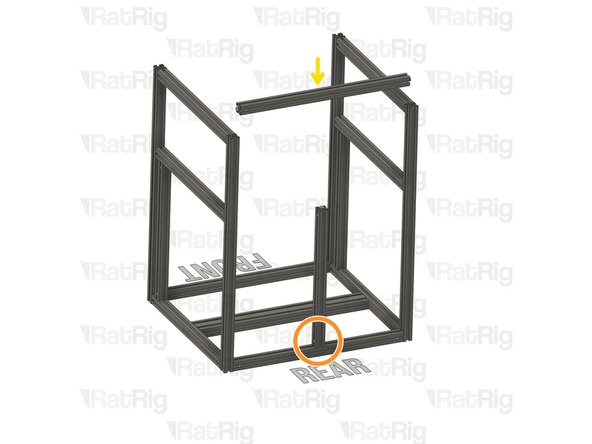
T-Slot 3030 Milled extrusion - 440mm
-
Align the T-nut pin with the bottom extrusion slot
-
Insert the T-nut pin in the bottom extrusion slot.
-
T-Slot 3030 Milled extrusion - 540mm
-
Insert the extrusion on the assembly, making sure the T-nut pins are aligned with the side extrusion slots.
-
When sliding the extrusion to the right place, be careful, and take it slowly so as to not damage the extrusion coating.
-
-
-
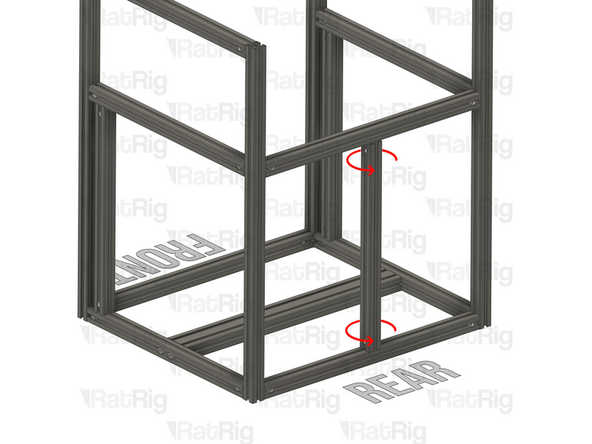
Carefully rotate the T-Slot 3030 Milled extrusion - 440mm 90º so the quick connectors face the side shown in the picture.
-
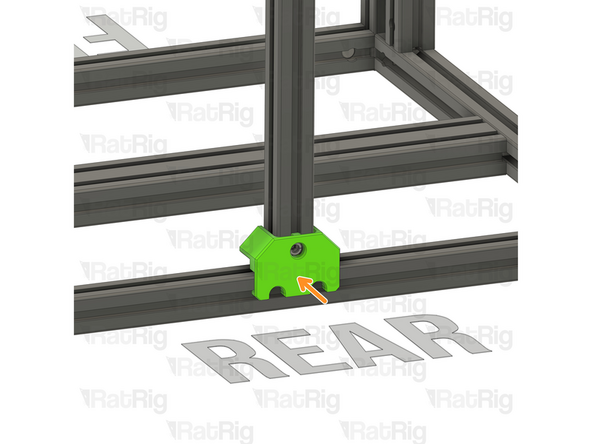
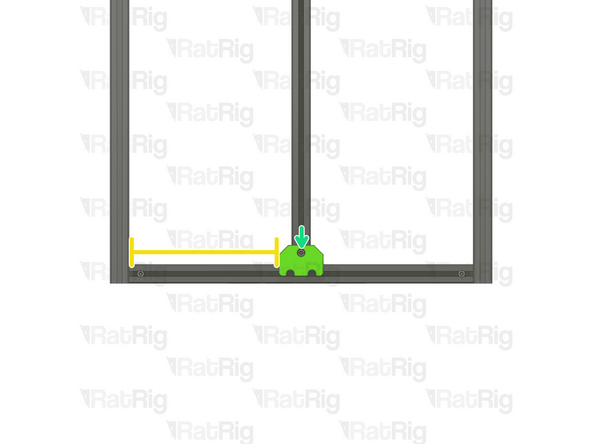
Insert the frame jig on the assembly, make sure the frame jig is inserted all the way and completely flush with the extrusion
-
Ensure the distance between the frame jig side wall and the frame extrusion is 235mm
-
It should be 285mm for the V-Core 4 400 and 335mm for the V-Core 4 500
-
Tighten the quick connector to secure the extrusions together.
-
Always verify the strength of the connection between the extrusions. If the connection is not strong, loosen the set screw, ensure that the T-nut pin groove is positioned below the set screw, and reconnect the extrusions.
-
-
-
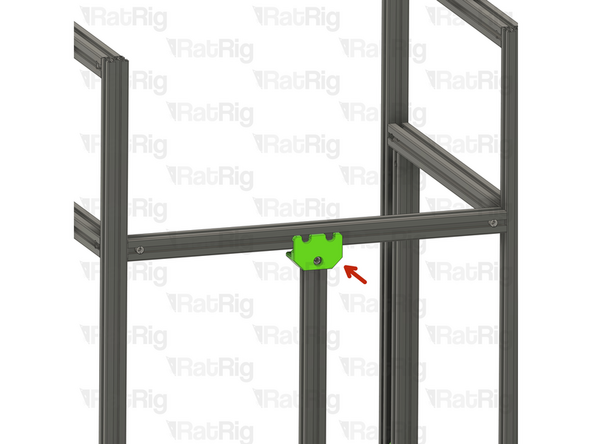
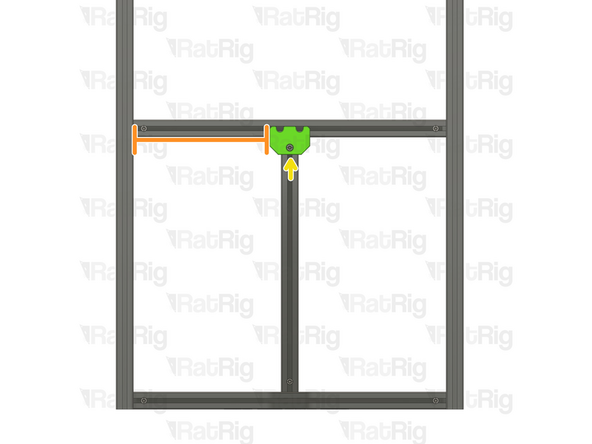
Insert the frame jig on the assembly, make sure the frame jig is inserted all the way and completely flush with the extrusion
-
Ensure the distance between the frame jig side wall and the frame extrusion is 235mm
-
Add 50mm for the V-Core 4 400 and 100mm for the V-Core 4 500
-
Tighten the quick connector to secure the extrusions together.
-
Always verify the strength of the connection between the extrusions. If the connection is not strong, loosen the set screw, ensure that the T-nut pin groove is positioned below the set screw, and reconnect the extrusions.
-
-
-
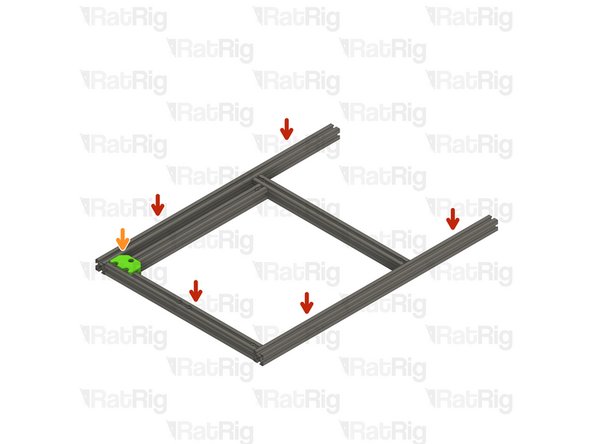
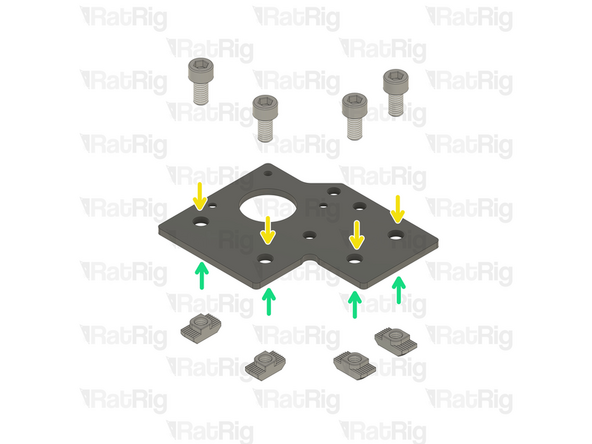
In this step, you will prepare two stepper motor plates with screws and T-nuts, although they will only be used to align the frame.
-
Rat Rig V-Core 4.0 - Motor Plate - Lower Left v1.0
-
Rat Rig V-Core 4.0 - Motor Plate - Lower Right v1.0
-
8x M6x12 Cap Head Screw
-
8x 3030 Drop In T-Nut M6
-
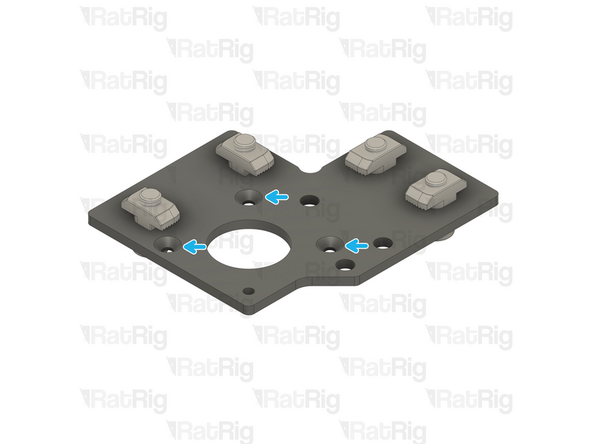
Loosely thread the 3030 T-Nuts onto the M6x12 screws. Do not tighten them at this point.
-
Please notice: The t-nuts should be on the same side as the countersink holes.
-
-
-
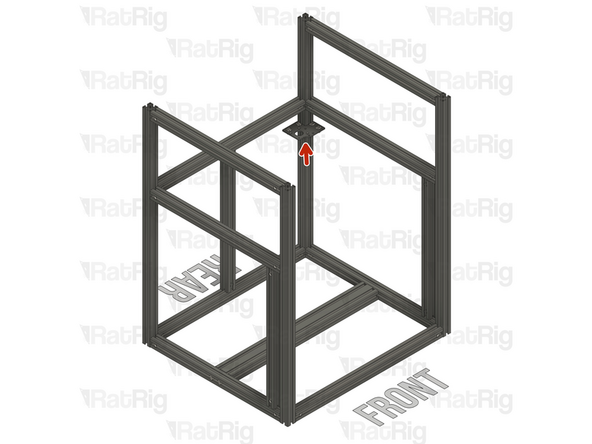
Install the Rat Rig V-Core 4.0 - Motor Plate - Lower Right v1.0 Assembly to the frame as shown
-
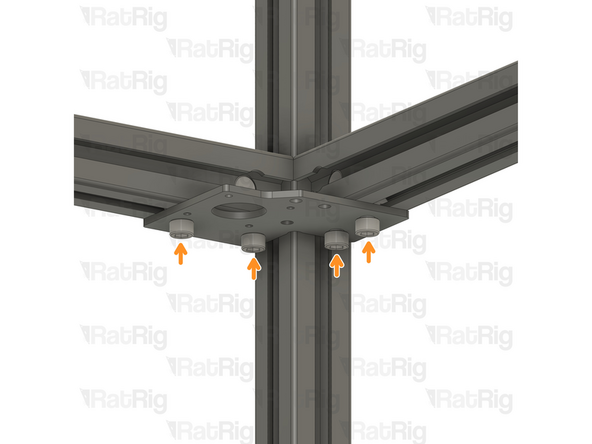
Tighten the M6x12 Cap Head Screws to secure the plate and guarantee the extrusions are perfectly aligned.
-
Tighten the quick connector to secure the extrusions together.
-
Always verify the strength of the connection between the extrusions. If the connection is not strong, loosen the set screw, ensure that the T-nut pin groove is positioned below the set screw, and reconnect the extrusions.
-
Remove the Rat Rig V-Core 4.0 - Motor Plate - Lower Right v1.0 Assembly and set it aside, it will be used later in the guide.
-
Repeat the Steps above for the other end of the extrusion, using the Rat Rig V-Core 4.0 - Motor Plate - Lower Left v1.0 Assembly
-
-
-
Make sure the front side extrusions have the 3xM3 holes facing the sides. Be aware of the extrusion orientation, the small spacing between the M3 holes must be upwards.
-
-
-
T-Slot 3030 Milled extrusion - 540mm
-
Insert the extrusion on the assembly, making sure the T-nut pins are aligned with the side extrusion slots.
-
Ensure the two extrusions are perfectly aligned
-
Refer to Step 10 on how to accurately align the extrusions.
-
Tighten the quick connectors to secure the extrusions together.
-
Always verify the strength of the connection between the extrusions. If the connection is not strong, loosen the set screw, ensure that the T-nut pin groove is positioned below the set screw, and reconnect the extrusions.
-
T-Slot 3030 Milled extrusion - 540mm
-
Insert the extrusion on the assembly, making sure the T-nut pins are aligned with the side extrusion slots.
-
-
-
Ensure the two extrusions are perfectly aligned
-
Refer to Step 10 on how to accurately align the extrusions.
-
Tighten the quick connectors to secure the extrusions together.
-
Always verify the strength of the connection between the extrusions. If the connection is not strong, loosen the set screw, ensure that the T-nut pin groove is positioned below the set screw, and reconnect the extrusions.
-
-
-
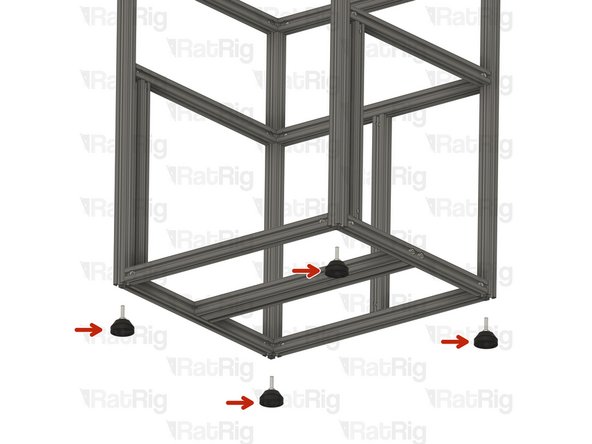
4 x V-Core 4 rubber feet
-
Tighten the four V-Core 4 rubber feet to the frame assembly
-
-
-
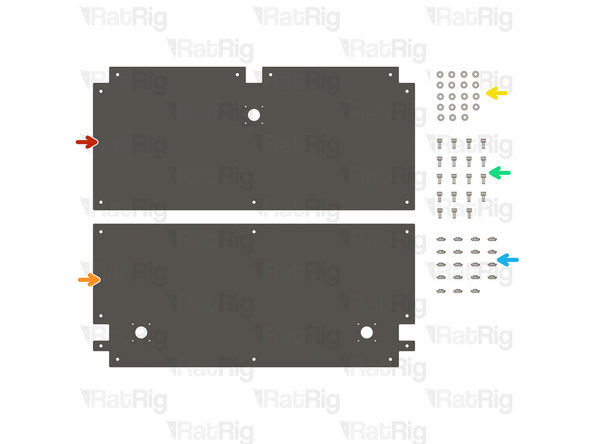
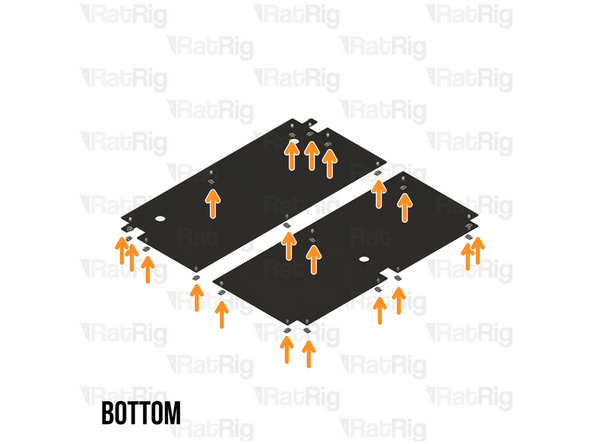
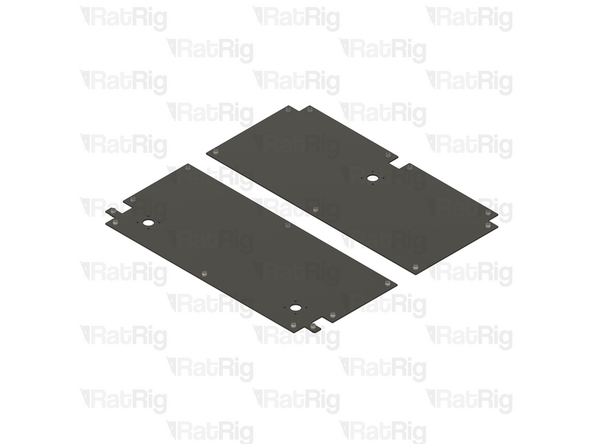
1x Rear base plate
-
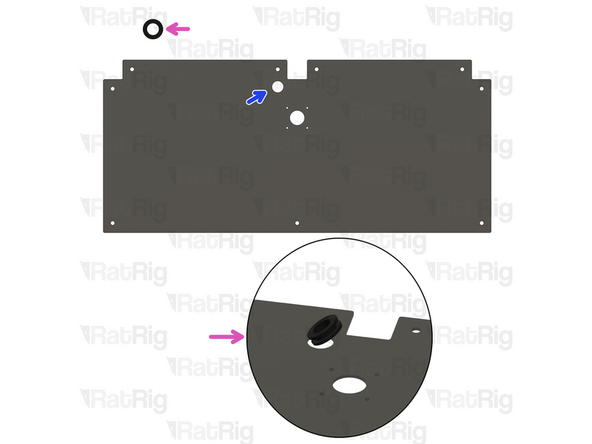
The rear plate has been recently updated. If you purchased your kit recently, your rear plate may feature a new hole for the Z stepper motor cable management. Refer to the second picture for more details.
-
1x Front base plate
-
19x M6 Washer
-
19x M6x12 Cap Head Screws
-
19x 3030 M6 Drop in T-Nut
-
Updated rear base plate with Z cable passthrough.
-
Rubber grommet. Insert the grommet in the designated hole.
-
-
-
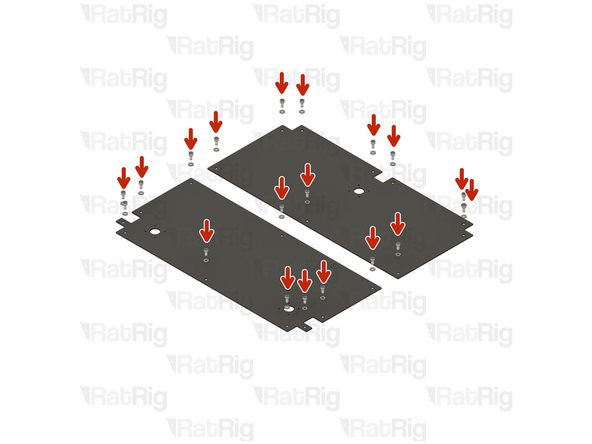
Inset a M6x12 Cap Head Screw + M6 washer on every 6mm hole on the base plates.
-
Loosely thread the 3030 T-Nuts onto the M6x12 screws. Do not tighten them at this point.
-
-
-
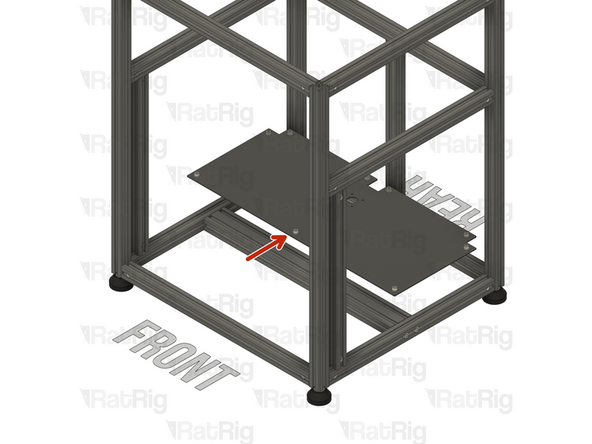
Rear base plate assembly
-
Carefully place it inside the frame
-
Ensure the base plate assembly is pushed all the way to the back and aligned with the rear extrusions.
-
When sliding the base plate assembly to the right place, be careful, and take it slowly so as to not damage the extrusion coating.
-
Place the base plate assembly on the bottom of the frame
-
Make sure every 3030 Drop In T-nut aligns with the extrusion slots
-
Tighten the M6x12 Cap Head Screws to secure the base plate assembly to the frame.
-
-
-
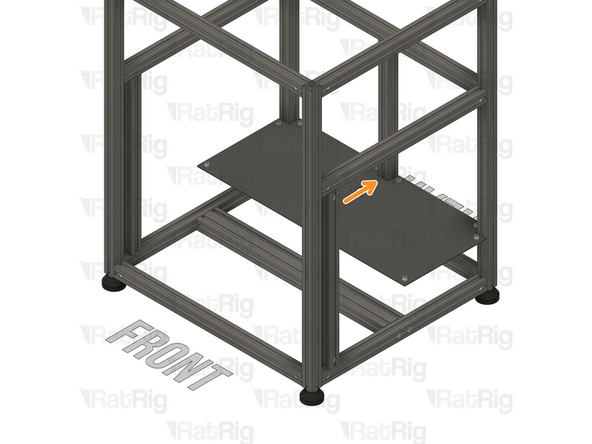
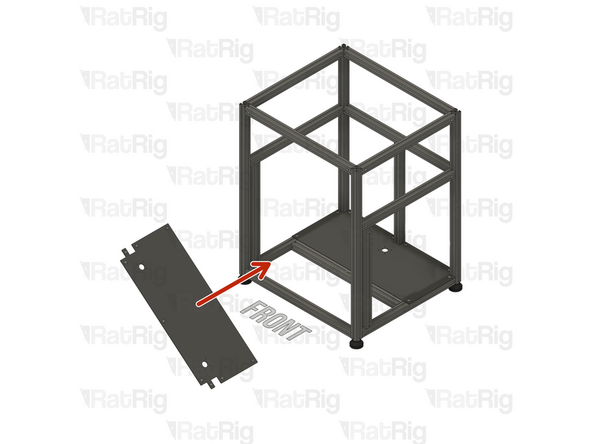
Insert the front base plate inside the frame assembly, at an angle so it can be rotated into place.
-
When sliding the base plate assembly to the right place, be careful, and take it slowly so as to not damage the extrusion coating.
-
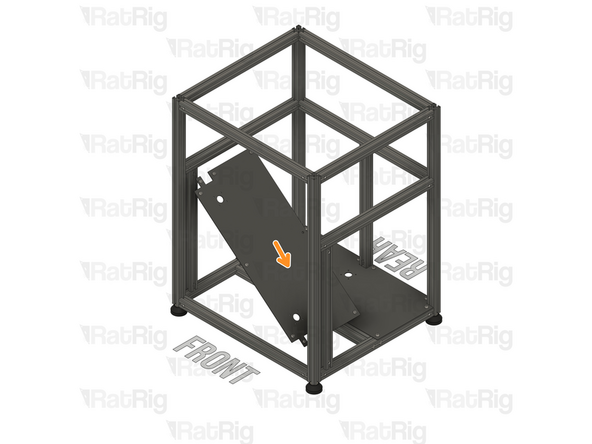
Carefully rotate the front base panel towards the side of the frame, as shown.
-
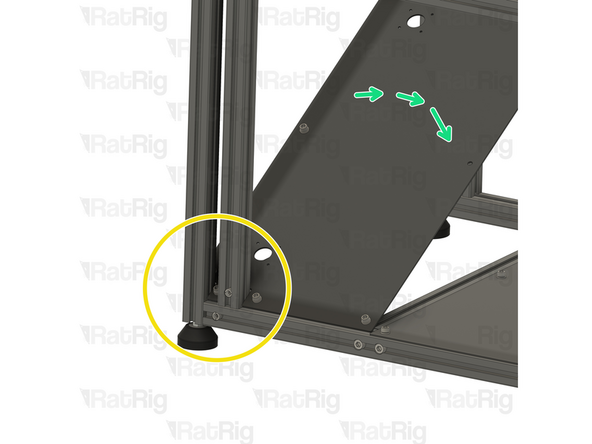
Align the base panel with the extrusions
-
Rotate the front base plate assembly into position.
-
-
-
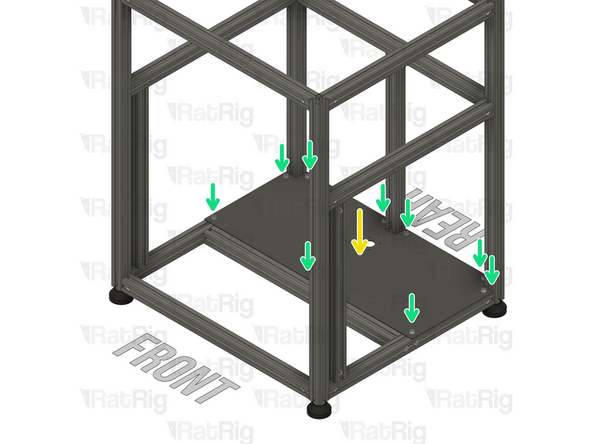
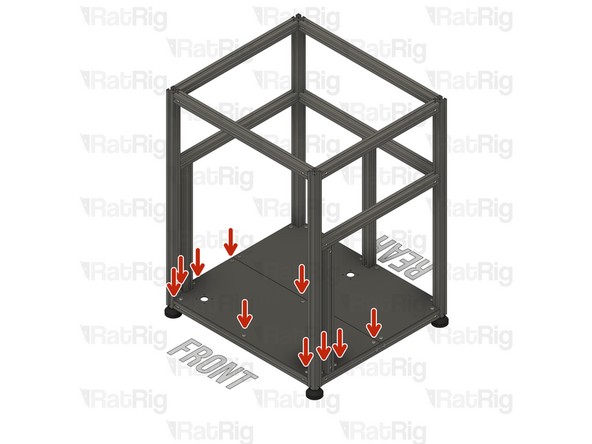
Tighten the M6x12 Cap Head Screws to secure the base plate assembly to the frame.
-
Cancel: I did not complete this guide.
29 other people completed this guide.
2 Comments
Some of the T-nuts I received arent beveled enough to be useful. picture of t-nuts in question. Any way I can resolve this quickly?
My 400mm version has no hole in the front center of the front baseplate. Is that a design revision, or do I need to grab a drill?
Also, the back plate with the new version (with grommet- it's labeled "Rubber Grommet 18x14x3" on the bag) does the hole belong on the left side when facing in from the front?
Cheers!


